Difference between revisions of "ADVISE Bank Robbery Tutorial Model"
| Line 46: | Line 46: | ||
==== Process ==== | ==== Process ==== | ||
| − | ===== Part A - Defining the | + | ===== Part A - Defining the Attack Execution Graph ===== |
We begin by creating a new project. | We begin by creating a new project. | ||
| Line 86: | Line 86: | ||
# Click on the attack step called "Write Down Account Information" to bring up the "Node Details" view. | # Click on the attack step called "Write Down Account Information" to bring up the "Node Details" view. | ||
# Define the cost of this attack to be 0. | # Define the cost of this attack to be 0. | ||
| − | ## In the "Attack Cost" section, enter | + | ## In the "Attack Cost" section, enter <syntaxhighlight lang="cpp">return 0;</syntaxhighlight> in the code box. |
# Set the attack execution time to be deterministically 5 time units. | # Set the attack execution time to be deterministically 5 time units. | ||
## Move down to the "Attack Execution Time" section. | ## Move down to the "Attack Execution Time" section. | ||
## Change the "Distribution" drop-down to read, "Deterministic". | ## Change the "Distribution" drop-down to read, "Deterministic". | ||
| − | ## In the Value tab, enter | + | ## In the Value tab, enter <syntaxhighlight lang="cpp">return 5;</syntaxhighlight> in the code box. |
# Set the precondition expression to require the adversary to have the Insider Knowledge knowledge, but not already have the Customer Information knowledge. | # Set the precondition expression to require the adversary to have the Insider Knowledge knowledge, but not already have the Customer Information knowledge. | ||
## Move down to the "Preconditions" section. | ## Move down to the "Preconditions" section. | ||
| − | ## Enter the following code in the code box: | + | ## Enter the following code in the code box: <syntaxhighlight lang="cpp"> |
return (!CustomerInformation->Mark() && InsiderKnowledge->Mark()); | return (!CustomerInformation->Mark() && InsiderKnowledge->Mark()); | ||
| − | </syntaxhighlight> | + | </syntaxhighlight> |
# Move down to the "Outcomes" section. | # Move down to the "Outcomes" section. | ||
# Verify that the number of outcomes is 1. | # Verify that the number of outcomes is 1. | ||
# Define the "Success" outcome. The "Success" outcome should be the only outcome of this step, so its outcome probability can be set to 1. The risk of detection for this outcome is 0.1. The effect of this outcome is that the adversary will gain the "Customer Information" knowledge. | # Define the "Success" outcome. The "Success" outcome should be the only outcome of this step, so its outcome probability can be set to 1. The risk of detection for this outcome is 0.1. The effect of this outcome is that the adversary will gain the "Customer Information" knowledge. | ||
## Change the "Name" field to "Success". | ## Change the "Name" field to "Success". | ||
| − | ## Enter | + | ## Enter <syntaxhighlight lang="cpp">return 1;</syntaxhighlight> for the outcome probability. |
| − | ## Enter | + | ## Enter <syntaxhighlight lang="cpp">return 0.1;</syntaxhighlight> for the detection probability. |
| − | ## Enter the following code in the "Effects" code box: | + | ## Enter the following code in the "Effects" code box: <syntaxhighlight lang="cpp"> |
CustomerInformation->Mark() = true; | CustomerInformation->Mark() = true; | ||
| − | </syntaxhighlight> | + | </syntaxhighlight> |
# Click the "Impersonate Customer To Obtain Money" attack step. | # Click the "Impersonate Customer To Obtain Money" attack step. | ||
# Define the attack cost to be 0. | # Define the attack cost to be 0. | ||
| Line 111: | Line 111: | ||
# Define two outcomes for the attack step. | # Define two outcomes for the attack step. | ||
## The first outcome should be called "Failure" and have an outcome probability of 0.3, a detection probability of 0.9, and no effect (leave the "Effects" code box empty). | ## The first outcome should be called "Failure" and have an outcome probability of 0.3, a detection probability of 0.9, and no effect (leave the "Effects" code box empty). | ||
| − | ## The second outcome should be called "Success" and have an outcome probability of 0.7, a detection probability of 0, and the effect that the adversary gains the Money goal. Enter the following code in the "Effects" code box: | + | ## The second outcome should be called "Success" and have an outcome probability of 0.7, a detection probability of 0, and the effect that the adversary gains the Money goal. Enter the following code in the "Effects" code box: <syntaxhighlight lang="cpp"> |
Money->Mark() = true; | Money->Mark() = true; | ||
| − | </syntaxhighlight> | + | </syntaxhighlight> |
# Save the model by clicking "File" -> "Save." | # Save the model by clicking "File" -> "Save." | ||
# If any errors are reported, check the troubleshooting section or email the [mailto:users@mobius.illinois.edu Mobius users mailing list]. | # If any errors are reported, check the troubleshooting section or email the [mailto:users@mobius.illinois.edu Mobius users mailing list]. | ||
| − | ===== Part B - Defining the | + | ===== Part B - Defining the Adversary ===== |
The attack execution graph has now been defined. Next we define the Adversary for the model. | The attack execution graph has now been defined. Next we define the Adversary for the model. | ||
Revision as of 16:03, 31 October 2014
Contents
- 1 ADVISE Bank Robbery Tutorial
- 1.1 Introduction
- 1.2 Topics Covered
- 1.3 Part 1
- 1.4 Part 2
- 1.5 Part 3
- 1.5.1 Prerequisites
- 1.5.2 Topics Covered
- 1.5.3 Process
- 1.5.3.1 Part A - Expanding the AEG
- 1.5.3.2 Part B - Expanding the Adversary Profile
- 1.5.3.3 Part C - Creating a SAN for the Manager's Behavior
- 1.5.3.4 Part D - Composing the Manager SAN with the ADVISE Model
- 1.5.3.5 Part E - Creating the Reward Model
- 1.5.3.6 Part F - Creating the Study
- 1.5.3.7 Part G - Running the Simulation
- 1.5.4 Review
- 1.5.5 Troubleshooting
ADVISE Bank Robbery Tutorial
Introduction
Scenario
Universal Galactic Bank is located in a downtown metropolitan area, nestled among large skyscrapers and office parks. The bank performs the standard banking operations that a modern-day bank provides. It has a drive-through teller, an outdoor ATM machine, an indoor lobby with tellers, safe deposit boxes, a vault, and meeting offices where clients may conduct other business (e.g., arrange loans). The vault is protected by a thick titanium door with a sophisticated electronic combination lock. The combination is known by the head manager for day-to-day operations, and it changes daily. There are security guards who run a front desk at the entrance of the bank. One guard also monitors security cameras from a central film room. The security cameras watch the front door, the main lobby, the tellers, the vault door, and the inside of the vault. Public infrastructure tunnels run underneath the bank. There are roof access points at the stairwells and the HVAC exhaust ducts on the roof. There is also an alarm system to summon the police. Unauthorized access from the roof or through the front door will set it off. The guards may also manually pull the alarm.
Explanation
The above scenario describes a fictitious bank that will be central to this tutorial. You will create an ADVISE model to model adversaries who would like to achieve a variety of goals. The scenario is open-ended to allow you to use your creativity in coming up with ways a robber could attempt to pull off a heist. The tutorial will walk you through the beginning steps of building a model and giving attributes to the adversary, with the end goal of running a simulation of an attack on the bank. The tutorial uses an insider threat (a compromised teller) and a con artist as two adversaries. The first two models deal with the insider threat attack, while the final model incorporates the con-artist attack vector.
Topics Covered
- Creating an attack execution graph
- Knowledge
- Steps
- Goals
- Defining attack steps
- Defining state-dependent attributes on attack steps
- Defining an adversary
- Composing the ADVISE model with other atomic models
- Defining reward variables on an ADVISE model
- Using a study to create several experiments
- Simulating an ADVISE model
Part 1
Prerequisites
Install the Möbius tool by following the instructions in the Getting Started section of the wiki. To create ADVISE models, you will need Möbius version 2.5 or greater.
Topics Covered
- Adding nodes to the Attack Execution Graph.
- Connecting nodes with arcs.
- Editing node attributes with the Node Details View.
- Defining adversary preferences.
- Defining initial knowledge.
- Defining goals with associated payoffs.
- Defining a reward model for an ADVISE atomic model.
- Defining a study for an ADVISE atomic model.
- Running a simulation for an ADVISE atomic model.
Process
Part A - Defining the Attack Execution Graph
We begin by creating a new project.
- Launch the Möbius tool.
- From the Möbius main menu, click on "Project" and select the "New" menu item from the drop-down list.
- The "Create New Project" dialog box will appear. You can enter the project name, the author(s) working on the project, and a general description of the project. For this tutorial, we will name the project "BankRobbery".
- Select the "Finish" button to create the project.
- Note that you can right-click on the "Open Projects" folder in the "Möbius Project Manager" window. A submenu will pop up. You can select "New Project" to get to the same "Create New Project" dialog.
- You should see a "BankRobbery" folder under the "Open Projects" folder. The "BankRobbery" folder will contain the following subfolders: "Atomic," "Composed," "Reward," "Study," "Transformer," and "Solver."
Defining the attack execution graph.
- Create a new ADVISE atomic model called "robbery".
- Right-click on the "Atomic" folder and select "New". The "Create New Project Component" dialog box will appear.
- Select "ADVISE Model" from the list of component types.
- Next, move to or select the "Component Name" text box. You can move to the "Component Name" text box by using the tab key.
- Enter the name "robbery".
- Click "Finish."
- The ADVISE editor window will pop up. The ADVISE editor consists of two parts: the "Attack Execution Graph" and "Adversary" editors. The different parts are selected by clicking on the tabs at the bottom left corner of the window. The default view is the Attack Execution Graph editor.
- Along the left side of the Attack Execution Graph editor is a palette of tools used to create the attack execution graph. Note that if you click on the small triangle next to the word "Palette," the palette tool window will shrink to hide itself. You can click on the small triangle again to expand the hidden palette window.
- Add a knowledge node named "Insider Knowledge" to the canvas.
- In the Attack Execution Graph editor, left-click the "Knowledge" item in the palette bar.
- Left-click a spot on the white canvas on the right side of the Attack Execution Graph editor window.
- A green circle should appear on the canvas, and the "Node Details" dialog should appear on the right side of the canvas. In the "Description" field, enter the name for the node, "Insider Knowledge". Notice that while we have a space in our description, the "Code Name" does not. If you are going to refer to this node in code, you must use the "Code Name".
- Add an attack step named "Write Down Account Information" below the "Insider Knowledge" node. Follow the same basic steps as you did in creating the Knowledge node. Note that the "Node Details" dialog now contains a lot more fields. We will come back to fill out the various fields later.
- Add a second knowledge node named "Customer Information" below the attack step.
- Add a second attack step named "Impersonate Customer To Obtain Money" below the second knowledge node.
- Add a goal named "Money" below the second attack step.
- Create an arc from the first knowledge node to the first attack step.
- Click on the "Connection" item in the palette.
- Click on the Knowledge node "Insider Knowledge" on the canvas.
- Click on the Attack Step node "Write Down Account Information" on the canvas.
- Create an arc from the first attack step to the second knowledge node.
- Create an arc from the second knowledge node to the second attack step.
- Create an arc from the second attack step to the goal.
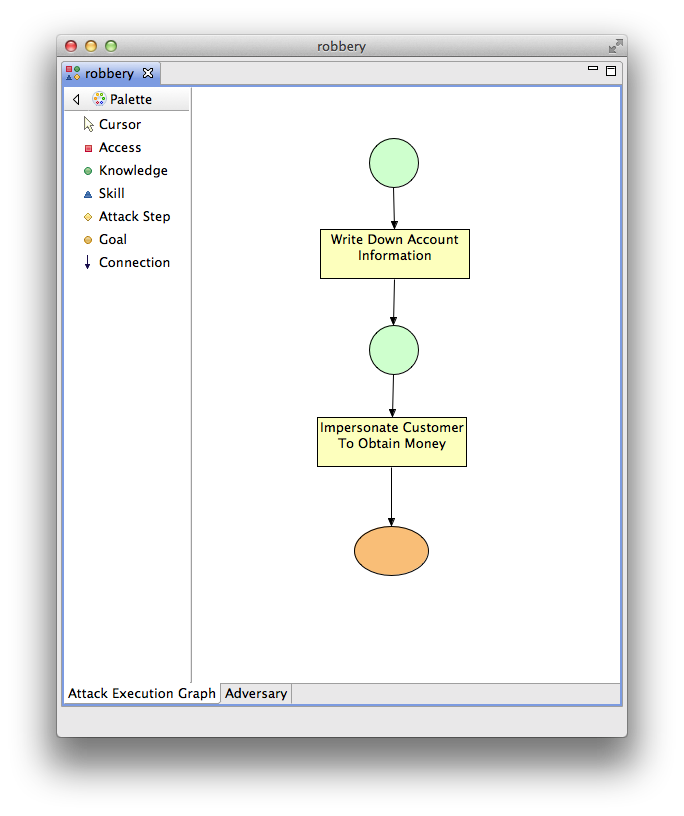
- Verify that your AEG now looks similar to the one in "Checkpoint Diagram 1-1."
- Click on the attack step called "Write Down Account Information" to bring up the "Node Details" view.
- Define the cost of this attack to be 0.
- In the "Attack Cost" section, enter in the code box.
return 0;
- In the "Attack Cost" section, enter
- Set the attack execution time to be deterministically 5 time units.
- Move down to the "Attack Execution Time" section.
- Change the "Distribution" drop-down to read, "Deterministic".
- In the Value tab, enter in the code box.
return 5;
- Set the precondition expression to require the adversary to have the Insider Knowledge knowledge, but not already have the Customer Information knowledge.
- Move down to the "Preconditions" section.
- Enter the following code in the code box:
return (!CustomerInformation->Mark() && InsiderKnowledge->Mark());
- Move down to the "Outcomes" section.
- Verify that the number of outcomes is 1.
- Define the "Success" outcome. The "Success" outcome should be the only outcome of this step, so its outcome probability can be set to 1. The risk of detection for this outcome is 0.1. The effect of this outcome is that the adversary will gain the "Customer Information" knowledge.
- Change the "Name" field to "Success".
- Enter for the outcome probability.
return 1;
- Enter for the detection probability.
return 0.1;
- Enter the following code in the "Effects" code box:
CustomerInformation->Mark() = true;
- Click the "Impersonate Customer To Obtain Money" attack step.
- Define the attack cost to be 0.
- Define the attack execution time to be deterministically 10 time units.
- Define the preconditions to require the adversary to have the Customer Information knowledge, but not already have the Money goal.
- Define two outcomes for the attack step.
- The first outcome should be called "Failure" and have an outcome probability of 0.3, a detection probability of 0.9, and no effect (leave the "Effects" code box empty).
- The second outcome should be called "Success" and have an outcome probability of 0.7, a detection probability of 0, and the effect that the adversary gains the Money goal. Enter the following code in the "Effects" code box:
Money->Mark() = true;
- Save the model by clicking "File" -> "Save."
- If any errors are reported, check the troubleshooting section or email the Mobius users mailing list.
Part B - Defining the Adversary
The attack execution graph has now been defined. Next we define the Adversary for the model.
- Switch to the Adversary Editor tab.
- Change the name to "Bank Employee"
- Change the planning horizon to 2. This says that the adversary is able to consider up to two attack steps into the future when determining the next most attractive step to attempt.
- Change the Preference weights
- Change the Cost to be 0. This means the adversary doesn't care about costs at all (you may have noticed that our attacks steps have no cost).
- Change the Detection to be 0.2. This means the adversary cares a little about not being detected.
- Change the Payoff to be 0.8. This means the adversary cares mostly about getting a good payoff.
- Add the Insider knowledge to the set of initial knowledge
- Click the Add.. button in the Knowledge section.
- Select the Insider Knowledge item on the left.
- Click the > button.
- Click the Finish button.
- Add the Money goal to the set of goals with a payoff of 1000.
- Click the Add... button in the Goals section.
- Select the Money item on the left.
- Click the > button.
- Click the Payoff column of the Money item on the left to change the value from 0 to 1000.
- Click Finish.
- Save the model.
Congratulations on creating your first ADVISE atomic model! This is a very simple example meant to get your feet wet and the values are selected to ensure that we can see some results in the simulation.
Part C - Defining the Reward Model
Let's create the remaining pieces of this Möbius model. The remaining items are all the same as the normal Möbius distribution, so the steps will be at a higher level. For those new to Möbius in general, please review the Möbius tutorial in the Möbius Manual.
- Create a new Performance Variable reward model named "robberyRM."
- Add a new variable called "k_insider."
- Define the rate reward to be:
return robbery->InsiderKnowledge->Mark();
- In the "Time" tab, define the timing to be an instant of time with an incremental range. The range should be 0-60 with a step size of 5.
- Define the rate reward to be:
- Add a new variable called "k_custinfo."
- Define the rate reward to be:
return robbery->CustomerInformation->Mark();
- Define the timing to be an instant of time with an incremental range. The range should be 0-60 with a step size of 5.
- Define the rate reward to be:
- Add a new variable called "g_money."
- Define the rate reward to be:
return robbery->Money->Mark();
- Define the timing to be an instant of time with an incremental range. The range should be 0-60 with a step size of 5.
- Define the rate reward to be:
- Save and close the reward model.
You now have a reward model for your ADVISE atomic that measures the state of each knowledge and goal at 5 time unit intervals. This should give us a rough view of how the adversary will progress through the model.
Part D - Defining the Study
- Create a new Range Study called "robberyStudy."
- Save and close the study.
Since there are no global variables defined in our model, we need to simply create an empty study.
Part E - Running the Simulation
- Create a new Simulation called, "robberySim", in the Solver folder.
- Click on the Run Simulation tab and click the Start Simulation button.
- Wait for the simulation to complete and you should now be looking at the Results tab.
- Scroll down to see the mean values of the three reward variables at the various time points.
- Values should be similar to these results.
You should notice that the k_insider is 1.0 from the very beginning because the adversary has that knowledge as part of their initial knowledge and at no point during the execution do they lose that knowledge. The k_custinfo becomes 1.0 at time 5 because the first attack step always takes 5 time units to complete and it always results in the adversary gaining the Customer Information knowledge. The g_money reward variable begins to show us some more interesting information. At time point 15, we begin to see that the there is a 70% chance that the adversary will have attained the goal. Because the chance of the success outcome being chosen in the "Impersonate Customer To Obtain Money" step is a uniform 0.7, this makes sense. The values then proceed to increase over time as the adversary is given another chance to perform that step in the event that they failed the first time.
Review
The model you just created contains two pieces of knowledge, two attack steps, and a goal. This simple model is intended to demonstrate how knowledge is acquired and goals are achieved by the adversary performing attack steps.
The model is executed by considering the available attack steps (steps with preconditions that evaluate to true) in the model and choosing the most attractive step to take based on the interests of the adversary. In the beginning of this model, the "Write down account information" (WDAI) and "Do Nothing" (DN) attack steps are available. The attractiveness of the WDAI step turns out to be greater than the DN step, so the WDAI is chosen to be attempted. Since there is only a single outcome, in the WDAI step, it is chosen and the Adversary gains the "Customer Information" knowledge. At this point, the "Impersonate customer to obtain money" (ICTOM) step and the DN step are available. The attacker now finds the ICTOM step to be more attractive and attempts it. Now, there is a chance that this attempt will fail or succeed based on which of the two outcomes are chosen. In the event that the step fails, the state doesn't change and the attacker will try again. If the attacker succeeds, the "Money" goal is attained and the attacker will perform the DN step from that point forward.
It is important to recognize that the determination of most attractive attack steps is deterministic based on state. The stochasticity of the model comes from the selection of outcomes when an attack step is attempted. A common problem people run into when creating their own models is that the attacker reaches a point (often at the beginning) where it determines that the most attractive step is the Do Nothing step. Once the attacker chooses the Do Nothing step, (assuming the Do Nothing step does not change the state) the attacker will always choose the Do Nothing step.
The user can watch the selection of attack steps by examining the simulation trace.
Troubleshooting
This section will be added to when common problems are reported.
If you haven't found a solution to your problem, please email the Mobius users mailing list.
Part 2
Prerequisites
This part of the tutorial builds on the previous part. Before starting on part 2, be sure that you have correctly completed part 1. Alternatively, if you'd like to skip part 1, you can download and use this project which is the BankRobbery project after completing Part 1.
Topics Covered
- Editing an attack execution graph
- Access
- Skill
- Editing an adversary profile
- Defining skill proficiencies.
- Using global variables
- Defining experiments in a study.
Process
Part A - Expanding the AEG
- Open the BankRobbery Möbius model.
- Right click on the robbery atomic model and select Copy.
- In the "To" column, enter the name "robbery2" and click OK.
- Click No at the next prompt.
- Open the robbery2 atomic model.
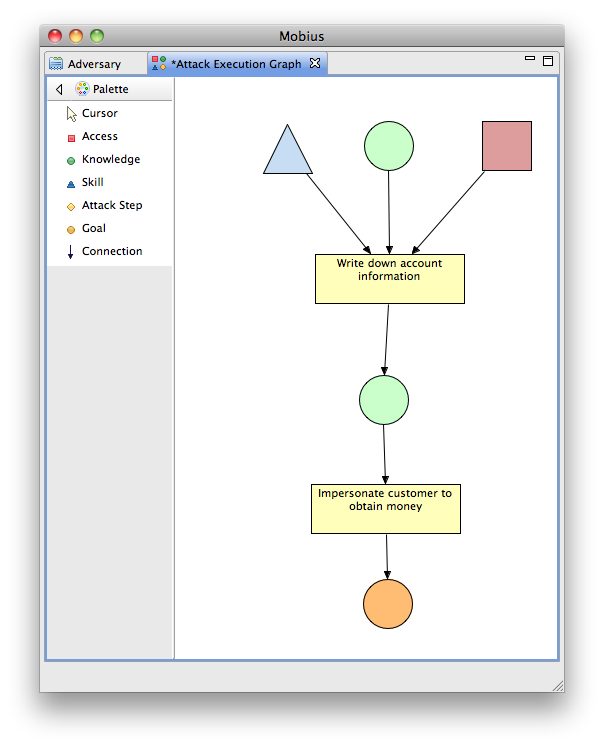
- Add a skill called "Sneaky Skill" next to the Insider Knowledge.
- Add an access called "Teller Access" next to the Insider Knowledge.
- Connect both the new skill and the new access to the WDAI attack step.
- Verify that your diagram looks similar to the one in Checkpoint Diagram 2-1.
- Select the WDAI attack step and edit its details
- Change precondition expression to the following:
  return !CustomerInformation->Mark() && TellerAccess->Mark()
      && (InsiderKnowledge->Mark() || SneakySkill->Mark() >500);
Part B - Expanding the Adversary Profile
Since we are adding more nodes to the AEG, you also need to update the adversary profile. We are going to set up the atomic model so that we can vary the adversary's proficiency level and whether or not it has the InsiderKnowledge in the study. This will require us to use some global variables in the model definition.
- Go to the "Bank Employee" tab of the robbery2 atomic model.
- Click on "Edit" -> "Global Variables."
- Add a new global variable called "hasInsiderKnowledge" of type short.
- Enter "hasInsiderKnowledge" in the "Name" field
- Verify that the "Type" drop down box is on "short"
- Click the "Add" button.
- Add a new global variable called "sneakySkillProf" of type short.
- Click the "Finish" button.
- Add the Sneaky Skill to the set of Skills for the Bank Employee.
- For the proficiency, enter "sneakySkillProf"
- Add the Teller Access to the set of initial access.
- Remove the Insider Knowledge from the set of initial knowledge.
- Set up the InsiderKnowledge to be initialized by the hasInsiderKnowledge global variable.
- Click on Edit->Custom Initialization.
- Enter the following code in the code box:
InsiderKnowledge->Mark() = hasInsiderKnowledge;
- Click Finish.
- Save and close the atomic model.
Part C - Creating the Reward Model
We've now modified the robbery atomic to have two new items on the AEG and the adversary profile uses two global variables to initialize the profile from values which we will define in the study. Next, we need to create a reward model.
- Create a new reward model called robberyRM2 with the same instructions as in part 1, but choose the robbery2 atomic model as its child.
Part D - Creating the Study
Now, we need a new study that provides interesting global variable values to the atomic model.
- Create a new range study called robberyStud2 and choose robberyRM2 as its child.
- Notice that we now have two variables in the table.
- Select the hasInsiderKnowledge variable and click the Incremental Range button.
- Change the Final field to be 1 and Click OK.
- Select the sneakySkillProf and click the Manual Range button.
- Enter the value 200 in the New Value field and click Enter.
- Enter the value 800 in the New Value field and click Enter.
- Select the 0 item from the Current Values list and click the Delete button.
- Click OK.
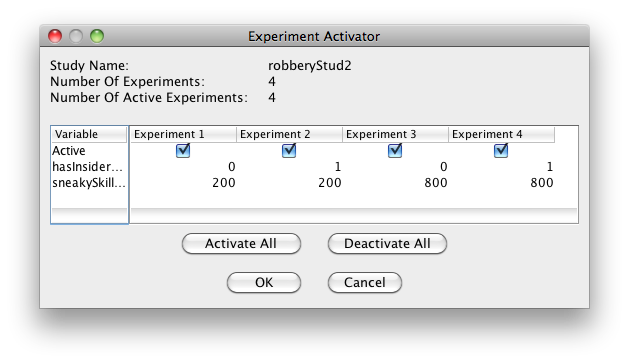
- Click the Experiment Activator button and verify that the window matches Checkpoint Image 2-2.
- Click OK.
- Save and close the Study.
Part E - Running the Simulation
We now have defined a study with four experiments. Next we need to run the simulation.
- Create a new simulator called robberySim2.
- Run the simulation and view the results.
- Verify that your results are similar to these results.
Notice that experiment 1 (no InsiderKnowledge and skill proficiency at 200) is not very interesting. This is because the adversary doesn't meet the preconditions of any attack step other than the Do Nothing step.
Experiment 2 and 4 shows us results identical to what we saw in part 1 of this tutorial because we start out with the InsiderKnowledge like before and model execution flows the same exact way.
Experiment 3 is only different from the part 1 results because we do not ever possess the InsiderKnowledge knowledge. However, we do possess a skill proficiency of 800 and the precondition for the first attack step demands at least 500. So, the adversary can pick the first attack step and the execution behaves the same. We simply never gain the InsiderKnowledge during execution.
Review
We have added a new access and skill to the AEG. We have also changed the adversary profile to use two global variables so that we can create a handful of experiments. We are now able to see how the skill, access, and knowledge of the adversary effects the behavior of the model.
Troubleshooting
This section will be added to when common problems are reported.
If you haven't found a solution to your problem, please email the Mobius users mailing list.
Part 3
Prerequisites
This part of the tutorial builds on the previous parts. Before starting on part 3, be sure that you have correctly completed part 1 and 2. Alternatively, if you'd like to skip the previous parts, you can download and use this project which is the BankRobbery project after completing parts 1 and 2.
Also, this part of the tutorial requires more knowledge of standard Möbius . In particular, the tutorial asks the user to build a basic SAN and Rep/Join model. If these steps prove to be difficult, please consult the Mobius Manual for more information.
Topics Covered
- Create additional attack steps
- Composing ADVISE Models with SANs
Process
Part A - Expanding the AEG
- Open the BankRobbery Möbius model.
- Right click on the robbery2 atomic model and select Copy.
- In the "To" column, enter the name "robbery3" and click OK.
- Click No at the next prompt.
- Open the robbery3 atomic model.
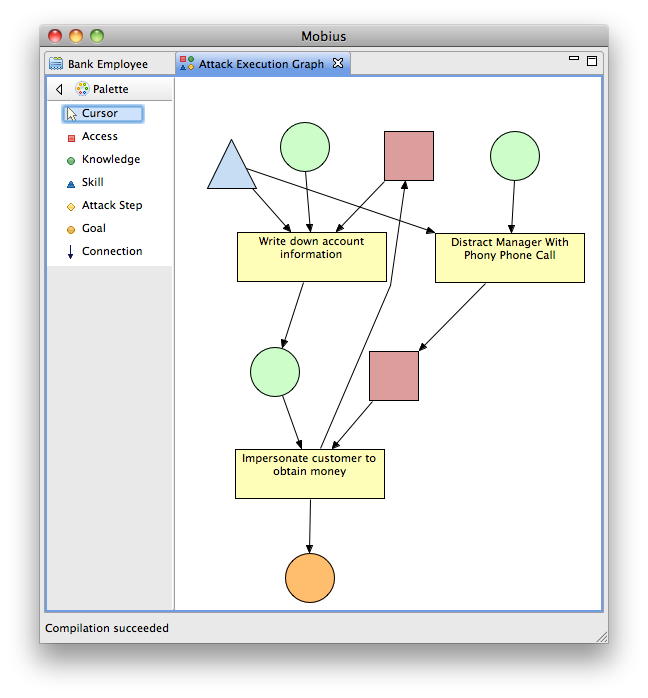
- Add a knowledge called "Manager Personal Information" to the right of the "Teller Access" access.
- Add a step called "Distract Manager With Phony Phone Call" to the right of the WDAI step.
- Add an access called "Manager Off-Duty" to the right of the "Customer Information" knowledge.
- Connect the new knowledge to the the step, the new step to the new access, and the new access to the ICTOM step.
- The execution time of our new step will depend on the Sneaky Skill, so also add a new connection from the Sneaky Skill to the DMWPPC step.
- The effects of the ICTOM step will be changed to effect the Teller Access, so create an arc from the ICTOM step to the Teller Access access.
- Verify that your diagram looks similar to the one in Checkpoint Diagram 3-1.
- Select the DMWPPC attack step and edit its details
- Define the attack cost to be 0.
- Define the distribution of attack execution time to be normal with parameters dependent on the adversary's Sneaky Skill proficiency.
- Enter the following code for the mean parameter:
if(SneakySkill->Mark() > 400) return 2; else return 6;
- Enter the following code for the variance parameter:
return 1;
- Enter the following code for the mean parameter:
- Enter the following code for the precondition expression:
return ManagerPersonalInformation->Mark() && !ManagerOffDuty->Mark();
- Define three outcomes:
- The first outcome should be called, "Failure Manager Detects Fraud." It should have a probability of 0.1, a detection probability of 0.9, and the following effects:
ManagerPersonalInformation->Mark() = false;
- The second outcome should be called, "Failure Manager Does Not Detect Fraud." It should have a probability of 0.2, a detection probability of 0.1, and no effects.
- The third outcome should be called, "Success." It should have a probability of 0.7, a detection probability of 0, and the following effects:
ManagerOffDuty->Mark() = true;
- The first outcome should be called, "Failure Manager Detects Fraud." It should have a probability of 0.1, a detection probability of 0.9, and the following effects:
- Select the ICTOM attack step and edit its details.
- Change the Failure outcome.
- Replace the outcome probability with the following code:
if(ManagerOffDuty->Mark()) return 0.1; else return 0.4;
- Replace the detection probability with the following code:
if(ManagerOffDuty->Mark()) return 0.2; else return 0.9;
- Add the following code to the effects:
if(!ManagerOffDuty->Mark()) { CustomerInformation->Mark() = false; TellerAccess->Mark() = false; }
- Replace the outcome probability with the following code:
- Change the Success outcome.
- Replace the outcome probability with the following code:
if(ManagerOffDuty->Mark()) return 0.9; else return 0.6;
- Replace the detection probability with the following code:
if(ManagerOffDuty->Mark()) return 0; else return 0.1;
- Replace the outcome probability with the following code:
- Change the Failure outcome.
- Save and close the robbery3 Attack Execution Graph.
Part B - Expanding the Adversary Profile
Since we are adding more nodes to the AEG, you also need to update the adversary profile.
- Open Bank Employee tab for the robbery3 atomic.
- Add the Manager Personal Information knowledge to the set of initial knowledge.
- Save and close the atomic model.
Part C - Creating a SAN for the Manager's Behavior
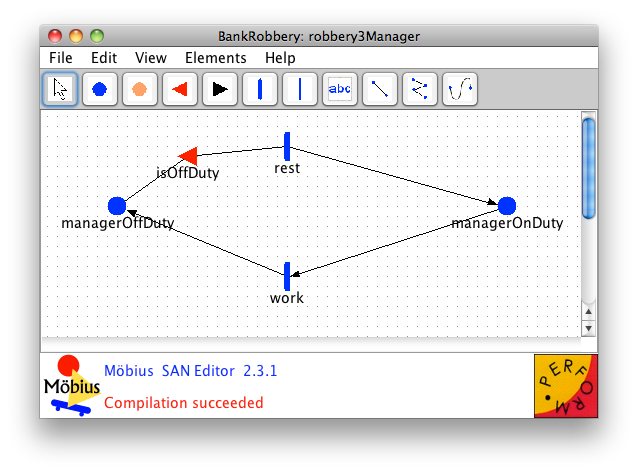
- Create a new SAN Atomic called "robbery3Manager"
- Add the SAN elements to the canvas in a flattened circle. I'll describe positions based on the face of a clock.
- Create a place at the 9:00 position called "managerOffDuty."
- Set the number of tokens to 0.
- Create an input gate at the 10:30 position called "isOffDuty."
- The input predicate should be:
managerOffDuty->Mark() > 0
- The input function should be:
managerOffDuty->Mark() = 0; managerOnDuty->Mark() = 0;
- The input predicate should be:
- Create a timed activity at the 12:00 position called "rest."
- Change the time distribution function to Deterministic and enter "14" for the value.
- Create a place at the 3:00 position called "managerOnDuty."
- Set the number of tokens to 1.
- Create a timed activity at the 6:00 position called "work."
- Change the time distribution function to Deterministic and enter "10" for the value.
- Create a place at the 9:00 position called "managerOffDuty."
- Connect the elements in a clockwise direction.
- Verify that your SAN looks like the one pictured in Checkpoint Diagram 3-2.
Part D - Composing the Manager SAN with the ADVISE Model
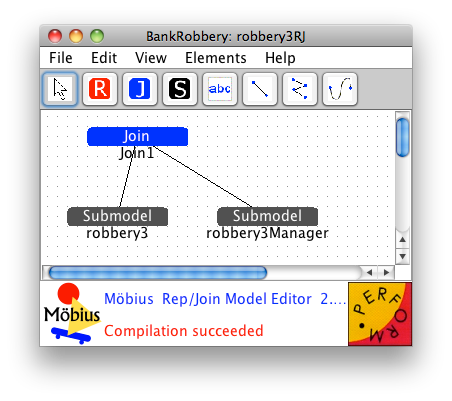
- Right click on Composed in the Project editor and create a new Rep/Join Composed model called "robbery3RJ."
- Add a new submodel to the canvas for robbery3 (the ADVISE atomic) using the default name.
- Add a new submodel to the canvas for robbery3Manager (the SAN atomic) using the default name.
- Add a join node above those and use the default name.
- Create a new arc from the join to each of the submodels.
- Verify that your composed model looks like the one in Checkpoint Diagram 3-3.
Part E - Creating the Reward Model
We've now created a composed model that joins the robbery3 and robbery3Manager atomic models. Next we need to create a reward model.
- Create a new reward model called robberyRM3 with the same instructions as in part 1 except this time the reward model's child should be robbery3RJ.
- Define a new performance variable called "k_manager".
- Define the rate reward to be:
return robbery3->ManagerOffDuty->Mark();
- Define the timing to be an instant of time with an incremental range. The range should be 0-60 with a step size of 5.
- Define the rate reward to be:
Part F - Creating the Study
- Create a new range study called robberyStud3 using the same steps as in part 2.
Part G - Running the Simulation
- Create a new simulator called robberySim3.
- Run the simulation and view the results.
- Verify that your results are similar to these results.
Notice that the results are similar to what we've seen in Part 2 of the tutorial. However, experiment 1 is now of interest because we can see the value of k_manager cycles back and forth between 0 and 1 thanks to the robbery3Manager SAN. Also, if you look at the results for a while, you'll notice that the additions to the AEG and adversary has changed the attack path and outcome significantly. Notice that success is no longer guaranteed in our model. If the adversary attempts the ICTOM step and fails while the manager is on duty, the manager revokes the Customer Information and Teller Access, which causes all attack paths to be blocked.
Review
We have further expanded the AEG and Adversary profile. Two attack steps were edited to add state dependent timing, detection, outcome probabilities, and outcome effects. We have also joined the AEG with a SAN using a Rep/Join Composed model.
Troubleshooting
This section will be added to when common problems are reported.
If you haven't found a solution to your problem, please email the Mobius users mailing list.
