Difference between revisions of "ADVISE Meta Alpha Tutorial"
(→Creating global variables) |
(→Creating global variables) |
||
| (44 intermediate revisions by 2 users not shown) | |||
| Line 14: | Line 14: | ||
=== Importing an Ontology === | === Importing an Ontology === | ||
| + | |||
| + | <!-- [[File:AMT-ontTree.png|50%|thumb|right|Ontology tree after importing ontology.]] --> | ||
Before we can start creating ADVISE Meta models, we need an ontology to work with. [[Media:MetaAlphaOntology.xml|Download the ontology]] used for this tutorial. | Before we can start creating ADVISE Meta models, we need an ontology to work with. [[Media:MetaAlphaOntology.xml|Download the ontology]] used for this tutorial. | ||
| Line 34: | Line 36: | ||
==== Creating global variables ==== | ==== Creating global variables ==== | ||
| − | We need to create two global variables for this tutorial. | + | |
| + | |||
| + | Global variables are model parameters that we can use to define experiments on our system by varying the initial values of the global variables. We need to create two global variables for this tutorial. | ||
# Right click on the AdviseMetaTutorial project folder, and click Properties. | # Right click on the AdviseMetaTutorial project folder, and click Properties. | ||
| Line 48: | Line 52: | ||
## Leave Short selected in the Type drop down menu. | ## Leave Short selected in the Type drop down menu. | ||
## Click Finish. | ## Click Finish. | ||
| − | # Click OK to exit. | + | # Click Apply, then click OK to exit. |
| + | |||
| + | [[File:ADVISE_Meta_Alpha_Tutorial_GlobalVariablesImg_14Aug2016.png|50%|frame|center|The global variables defined in the Project properties window.]] | ||
==== Creating a New ADVISE Meta Atomic Model ==== | ==== Creating a New ADVISE Meta Atomic Model ==== | ||
| Line 71: | Line 77: | ||
===== Creating Firewalls ===== | ===== Creating Firewalls ===== | ||
# In the components tree on the left, expand the Device component node under the PhysicalThing node to make the Firewall and Host component types visible, then expand the Firewall component node to make the FirewallAppliance and FirewallHosted component types visible. | # In the components tree on the left, expand the Device component node under the PhysicalThing node to make the Firewall and Host component types visible, then expand the Firewall component node to make the FirewallAppliance and FirewallHosted component types visible. | ||
| − | # Add a '''FirewallHosted''' and name it '''CorpLanScadaLanFW'''. | + | # Add a '''FirewallHosted''' and name it '''CorpLanScadaLanFW'''. Enter ''userAuthStrength'' in the '''strengthOfUserAuthentication''' textbox, and enter ''userAuthType'' in the '''userAuthenticationType''' textbox. [[File:ADVISE_Meta_Alpha_Tutorial_FireWallDetails_14Aug2016.png|center|frame|This is an example of a completed firewall component. ]] |
| − | # Add another '''FirewallHosted''' and name it '''CorpLanEngrLanFW'''. | + | # Add another '''FirewallHosted''' and name it '''CorpLanEngrLanFW'''. Enter ''userAuthStrength'' in the '''strengthOfUserAuthentication''' textbox, and enter ''userAuthType'' in the '''userAuthenticationType''' textbox. |
# Add another '''FirewallHosted''' and name it '''EngrLanScadaLanFW'''. Change '''strengthOfUserAuthentication''' from 0 to 1, and change '''userAuthenticationType''' from N to W. | # Add another '''FirewallHosted''' and name it '''EngrLanScadaLanFW'''. Change '''strengthOfUserAuthentication''' from 0 to 1, and change '''userAuthenticationType''' from N to W. | ||
# Add a new '''onNetwork''' relationship from the CorpLanScadaLanFW to the corpLAN component. | # Add a new '''onNetwork''' relationship from the CorpLanScadaLanFW to the corpLAN component. | ||
| Line 104: | Line 110: | ||
# Select the '''Goals''' tab at the bottom of the ADVISE Meta Atomic Model Editor window. | # Select the '''Goals''' tab at the bottom of the ADVISE Meta Atomic Model Editor window. | ||
# Select the '''New Goal 1''' goal from the list in the upper right. | # Select the '''New Goal 1''' goal from the list in the upper right. | ||
| − | # Change the name below to read ''' | + | # Change the name below to read '''Goal_GainScadaNetworkAccess''' |
# Add the '''SCADALAN_NetworkAccess''' state variable to the list of state variables | # Add the '''SCADALAN_NetworkAccess''' state variable to the list of state variables | ||
## Expand the '''SCADALAN''' component in the Available State Variables tree on the left side of the window. | ## Expand the '''SCADALAN''' component in the Available State Variables tree on the left side of the window. | ||
| Line 110: | Line 116: | ||
# Change the text in the '''Goal Expression''' to the following code: <syntaxhighlight lang="cpp">return SCADALAN_NetworkAccess->Mark();</syntaxhighlight> | # Change the text in the '''Goal Expression''' to the following code: <syntaxhighlight lang="cpp">return SCADALAN_NetworkAccess->Mark();</syntaxhighlight> | ||
# Click the File -> Save menu item. | # Click the File -> Save menu item. | ||
| + | |||
| + | [[File:ADVISE_Meta_Alpha_Tutorial_GoalExample_14Aug2016.png|center|frame|This is an example of the completed goal definition. ]] | ||
==== Creating an Adversary Model ==== | ==== Creating an Adversary Model ==== | ||
| Line 116: | Line 124: | ||
# Click and drag the '''IndependentInsider''' adversary template over to the '''Adversaries''' list on the right side. | # Click and drag the '''IndependentInsider''' adversary template over to the '''Adversaries''' list on the right side. | ||
# Change the name below to '''EngineerInsider'''. | # Change the name below to '''EngineerInsider'''. | ||
| + | # Change '''Cost of Detection''' to 100000. | ||
# In the '''Access''' section, add the access elements the adversary holds at the beginning of the attack. | # In the '''Access''' section, add the access elements the adversary holds at the beginning of the attack. | ||
| − | ## Click the '''Add''' button. | + | ## Click the '''Add...''' button. |
## Select the '''CorpLAN_PhysicalAccess''' element in the left pane, and click the '''>''' button to move it to the right pane. | ## Select the '''CorpLAN_PhysicalAccess''' element in the left pane, and click the '''>''' button to move it to the right pane. | ||
## Select the '''CorpLanEngrLanFW_PhysicalAccess''' element in the left pane, and click the '''>''' button to move it to the right pane. | ## Select the '''CorpLanEngrLanFW_PhysicalAccess''' element in the left pane, and click the '''>''' button to move it to the right pane. | ||
| Line 137: | Line 146: | ||
## Select the '''SSHServer_UIAccess''' element in the left pane, and click the '''>''' button to move it to the right pane. | ## Select the '''SSHServer_UIAccess''' element in the left pane, and click the '''>''' button to move it to the right pane. | ||
## Click Finish. | ## Click Finish. | ||
| − | # The adversary does not start the attack with any special knowledge of the system | + | # The adversary does not start the attack with any special knowledge of the system. |
| + | # Customize the adversary's skill level in the Skills section. | ||
| + | ## Click the '''Add...''' button. | ||
| + | ## Change the initial value of the KineticEquipmentAttack skill to 750. | ||
| + | ## Click Finish | ||
# In the '''Goals''' section, add the '''Goal_GainNetworkAccessOnScadaNetwork''' goal. | # In the '''Goals''' section, add the '''Goal_GainNetworkAccessOnScadaNetwork''' goal. | ||
| − | ## Click the '''Add''' button. | + | ## Click the '''Add....''' button. |
| − | ## Select the ''' | + | ## Select the '''Goal_GainScadaNetworkAccess''' element in the left pane, and click the '''>''' button to move it to the right pane. |
| − | ## Select the ''' | + | ## Select the '''Goal_GainScadaNetworkAccess''' element, and then press the '''Payoff''' cell and enter the value '''50000'''. |
## Click Finish. | ## Click Finish. | ||
# Click the File -> Save menu item. | # Click the File -> Save menu item. | ||
| − | ==== Creating a Configuration ==== | + | ==== Creating a Weak Firewalls Configuration ==== |
# Select the '''Configurations''' tab at the bottom of the ADVISE Meta Atomic Model Editor window. | # Select the '''Configurations''' tab at the bottom of the ADVISE Meta Atomic Model Editor window. | ||
| Line 152: | Line 165: | ||
# Add the goal defined previously to the configuration. | # Add the goal defined previously to the configuration. | ||
## Click the '''Add''' button in the Goals section. | ## Click the '''Add''' button in the Goals section. | ||
| − | ## Select the ''' | + | ## Select the '''Goal_GainScadaNetworkAccess''' goal from the list. |
| + | ## Click Finish. | ||
| + | # Select '''EngineerInsider''' as the adversary for this configuration from the drop down list. | ||
| + | # Enter 1 as the Value for '''userAuthStrength''' in the Global Variables pane. | ||
| + | # Enter 'W' (including the apostrophes) as the Value for '''userAuthType''' in the Global Variables pane. | ||
| + | # Click the File -> Save menu item. | ||
| + | |||
| + | [[File:ADVISE_Meta_Alpha_Tutorial_ConfigurationExample_14Aug2016.png|center|frame|This is an example of the completed configuration. ]] | ||
| + | |||
| + | ==== Creating a Strong Firewalls Configuration ==== | ||
| + | |||
| + | # Click on the Add button in the upper left of the screen to add another configuration. | ||
| + | # Change the name on the right side to read '''StrongFirewalls''' | ||
| + | # Add the goal defined previously to the configuration. | ||
| + | ## Click the '''Add''' button in the Goals section. | ||
| + | ## Select the '''Goal_GainScadaNetworkAccess''' goal from the list. | ||
## Click Finish. | ## Click Finish. | ||
# Select '''EngineerInsider''' as the adversary for this configuration from the drop down list. | # Select '''EngineerInsider''' as the adversary for this configuration from the drop down list. | ||
| − | # | + | # Enter 8 as the Value for '''userAuthStrength''' in the Global Variables pane. |
| + | # Enter 'T' (including the apostrophes) as the Value for '''userAuthType''' in the Global Variables pane. | ||
# Click the File -> Save menu item. | # Click the File -> Save menu item. | ||
| Line 163: | Line 192: | ||
# Select the '''Generator''' tab at the bottom of the ADVISE Meta Atomic Model Editor window. | # Select the '''Generator''' tab at the bottom of the ADVISE Meta Atomic Model Editor window. | ||
| − | # Select the '''WeakFirewalls''' | + | # Select the '''WeakFirewalls''' and '''StrongFirewalls''' configurations by shift-clicking from the list on the left. |
| − | # Click the '''Generate''' button. | + | # Click the '''Generate''' button. Be patient, this process may take a couple of minutes. |
| − | # | + | # After getting confirmation of the creation of the simulator, Click on the File->Close menu item. |
| − | |||
| − | |||
| − | |||
| − | |||
| − | |||
| − | |||
=== Defining the Reward Model === | === Defining the Reward Model === | ||
| Line 177: | Line 200: | ||
We will define a performance variable that will track whether the adversary achieved the goal over a 24-hour period. | We will define a performance variable that will track whether the adversary achieved the goal over a 24-hour period. | ||
| − | # Expand the '''Reward''' subfolder in the projects view to reveal ''' | + | # Expand the '''Reward''' subfolder in the projects view to reveal '''newADVISEModelPVs''' model and double click it to open it. |
# Add a new variable called '''GoalAchieved''' by entering "GoalAchieved" into the textbox in the top left of the dialog and then pressing "Add Variable:". | # Add a new variable called '''GoalAchieved''' by entering "GoalAchieved" into the textbox in the top left of the dialog and then pressing "Add Variable:". | ||
| − | # In the "Rate Rewards" tab, define the reward function to be:<syntaxhighlight lang="cpp">return | + | # In the "Rate Rewards" tab, define the reward function to be:<syntaxhighlight lang="cpp">return newADVISEModel->Goal_GainScadaNetworkAccess->Mark();;</syntaxhighlight> |
# Click on the "Apply Changes" button. | # Click on the "Apply Changes" button. | ||
# In the "Time" tab, define the timing type to be an "Instant of Time" with an incremental range. The range should be 0-60 with a step size of 10. | # In the "Time" tab, define the timing type to be an "Instant of Time" with an incremental range. The range should be 0-60 with a step size of 10. | ||
| Line 193: | Line 216: | ||
This defines a reward model for your ADVISE atomic model that measures the state of the goal over a 24-hour period. | This defines a reward model for your ADVISE atomic model that measures the state of the goal over a 24-hour period. | ||
| − | === | + | === Running the Model and Viewing the Results === |
| − | + | # Expand the '''Solver''' subfolder in the Projects view and double click the '''newADVISEModelSim''' simulator. | |
| − | |||
| − | |||
| − | |||
| − | |||
| − | |||
| − | # Expand the '''Solver''' subfolder in the Projects view and double click the ''' | ||
# Click on the "Run Simulation" tab and click the "Start Simulation" button. | # Click on the "Run Simulation" tab and click the "Start Simulation" button. | ||
# Wait for the simulation to complete, this may take several minutes depending on the speed of your machine. When the simulation finishes you should now be looking at the "Results" tab. | # Wait for the simulation to complete, this may take several minutes depending on the speed of your machine. When the simulation finishes you should now be looking at the "Results" tab. | ||
| Line 207: | Line 224: | ||
# Values should be similar to | # Values should be similar to | ||
<syntaxhighlight lang="cpp"> | <syntaxhighlight lang="cpp"> | ||
| + | |||
| + | _________________________________Experiment 1_________________________________ | ||
| + | Start Time: Sun Aug 14 22:21:37 CDT 2016 | ||
| + | Finish Time: Sun Aug 14 22:22:26 CDT 2016 | ||
| + | Elapsed Running Time: 48.419 | ||
| + | Total CPU Time: 31.167 | ||
| + | Batches Completed: 1000 | ||
| + | Experiment Name: StrongFirewalls | ||
| + | Global Variable Settings: | ||
| + | Short userAuthStrength 8 | ||
| + | Character userAuthType 'T' | ||
| + | |||
| + | |||
_________________________________Mean Results_________________________________ | _________________________________Mean Results_________________________________ | ||
Name Time Mean Confidence Interval | Name Time Mean Confidence Interval | ||
GoalAchieved 0.0 0.0000000000E00 +/- 0.0000000000E00 | GoalAchieved 0.0 0.0000000000E00 +/- 0.0000000000E00 | ||
| − | GoalAchieved 2.0 | + | GoalAchieved 2.0 5.1500000000E-01 +/- 3.0991872098E-02 |
| − | GoalAchieved 4.0 | + | GoalAchieved 4.0 9.7000000000E-01 +/- 1.0578396025E-02 |
| − | GoalAchieved 6.0 | + | GoalAchieved 6.0 1.0000000000E00 +/- 0.0000000000E00 |
| − | GoalAchieved 8.0 1. | + | GoalAchieved 8.0 1.0000000000E00 +/- 0.0000000000E00 |
| − | GoalAchieved 10.0 | + | GoalAchieved 10.0 1.0000000000E00 +/- 0.0000000000E00 |
| − | GoalAchieved 12.0 | + | GoalAchieved 12.0 1.0000000000E00 +/- 0.0000000000E00 |
| − | GoalAchieved 14.0 | + | GoalAchieved 14.0 1.0000000000E00 +/- 0.0000000000E00 |
| − | GoalAchieved 16.0 | + | GoalAchieved 16.0 1.0000000000E00 +/- 0.0000000000E00 |
| − | GoalAchieved 18.0 | + | GoalAchieved 18.0 1.0000000000E00 +/- 0.0000000000E00 |
| − | GoalAchieved 20.0 | + | GoalAchieved 20.0 1.0000000000E00 +/- 0.0000000000E00 |
| − | GoalAchieved 22.0 | + | GoalAchieved 22.0 1.0000000000E00 +/- 0.0000000000E00 |
| − | GoalAchieved 24.0 | + | GoalAchieved 24.0 1.0000000000E00 +/- 0.0000000000E00 |
| + | |||
| + | |||
| + | _______________________________Variance Results_______________________________ | ||
| − | + | _______________________________Interval Results_______________________________ | |
| − | |||
| − | + | _____________________________Distribution Results_____________________________ | |
| − | + | _________________________________Experiment 2_________________________________ | |
| + | Start Time: Sun Aug 14 22:22:26 CDT 2016 | ||
| + | Finish Time: Sun Aug 14 22:23:25 CDT 2016 | ||
| + | Elapsed Running Time: 59.484 | ||
| + | Total CPU Time: 40.158 | ||
| + | Batches Completed: 10000 | ||
| + | Experiment Name: WeakFirewalls | ||
| + | Global Variable Settings: | ||
| + | Short userAuthStrength 1 | ||
| + | Character userAuthType 'W' | ||
| − | + | _________________________________Mean Results_________________________________ | |
| + | Name Time Mean Confidence Interval | ||
| + | GoalAchieved 0.0 0.0000000000E00 +/- 0.0000000000E00 | ||
| + | GoalAchieved 2.0 0.0000000000E00 +/- 0.0000000000E00 | ||
| + | GoalAchieved 4.0 3.0000000000E-03 +/- 1.0719782991E-03 (*) | ||
| + | GoalAchieved 6.0 3.6300000000E-02 +/- 3.6660807717E-03 (*) | ||
| + | GoalAchieved 8.0 1.6290000000E-01 +/- 7.2381403552E-03 | ||
| + | GoalAchieved 10.0 3.4830000000E-01 +/- 9.3385271315E-03 | ||
| + | GoalAchieved 12.0 4.9200000000E-01 +/- 9.7992354937E-03 | ||
| + | GoalAchieved 14.0 5.8290000000E-01 +/- 9.6648453634E-03 | ||
| + | GoalAchieved 16.0 6.6230000000E-01 +/- 9.2698070620E-03 | ||
| + | GoalAchieved 18.0 7.3310000000E-01 +/- 8.6702911980E-03 | ||
| + | GoalAchieved 20.0 7.8630000000E-01 +/- 8.0347836302E-03 | ||
| + | GoalAchieved 22.0 8.2660000000E-01 +/- 7.4207881630E-03 | ||
| + | GoalAchieved 24.0 8.6220000000E-01 +/- 6.7562607951E-03 | ||
| + | |||
| + | |||
| + | _______________________________Variance Results_______________________________ | ||
| − | |||
| − | + | _______________________________Interval Results_______________________________ | |
| − | |||
| − | |||
| − | + | _____________________________Distribution Results_____________________________ | |
| − | |||
| − | |||
| − | |||
| − | |||
| − | |||
| − | |||
| − | + | (*) This result did not converge to within the specified confidence interval | |
| − | + | </syntaxhighlight> | |
| − | |||
| − | |||
| − | |||
| − | + | Click the File->Close menu item. | |
| − | # | + | To see the adversary paths. |
| − | # | + | # Open the '''newADVISEModel''' ADVISE model under the Atomic folder. |
| − | # | + | # Press View |
| − | # | + | # Press Clear |
| + | # Press Show Results | ||
| + | Scroll around the Attack Execution Graph to see the adversary paths. | ||
| − | + | [[File:ADVISE_Meta_Alpha_Tutorial_StrongFirewallsImg_14Aug2016.png|center|900px|This is an example of the path chosen by the adversary through the strong firewall configuration. ]] | |
| − | + | [[File:ADVISE_Meta_Alpha_Tutorial_WeakFirewallsImg_14Aug2016.png|center|900px|This is an example of the path chosen by the adversary through the weak firewall configuration. ]] | |
| − | |||
| − | |||
| − | + | From these images we can derive the attack paths. | |
| + | When faced with the Strong Firewalls configuration the adversary follows this attack path: | ||
| + | #HMI_GainLocalUIAccessDevice | ||
| + | #SCADALAN_GainNetworkAccessViaNetworkNode | ||
| − | + | When faced with the Weak Firewalls configuration the adversary follows this attack path: | |
| + | #EngrLanScadaLanFW_GainRemoteUIAccessDevice | ||
| + | #EngrLanScadaLanFW_GainUserCredentials | ||
| + | #EngrLanScadaLanFW_GainLogicalAccess | ||
| + | #SCADALAN_GainNetworkAccessViaNetworkNode | ||
| − | + | == Interpreting the Results == | |
| − | |||
| − | |||
| − | |||
| − | |||
| − | |||
| − | |||
| − | |||
| − | |||
| − | |||
| − | |||
| − | |||
| − | |||
| − | + | According to this model, the adversary gains access to the SCADA network with a probability of approximately 0.86 after 24 hours, given a system configuration with firewalls with weak administrator authentication. However, the adversary gains access to the SCADA network with a probability of 1 after 24 hours, given a system configuration with firewalls with strong administrator authentication. | |
| − | + | This result may not agree with our intuition. We expect that strengthening the defenses will slow the adversary. However, the model says that the adversary achieves his or her goal faster when the defenses are strengthened. However, this surprising result can be explained. The adversary does not factor the speed of completing a set of attacks in this model, but only its net expected profitability (the expected payoff minus the expected cost). Though the adversary can achieve the goal faster with strengthened defenses, it costs more. Our results, presented below, show that with weak defenses the adversary has an net expected profit of 43090.2, but with the strengthened defenses the adversary has an expected net profit of only 35821.6. Strengthening the defenses reduces the adversary's expected profit by (43090.2 - 35821.6) = 7268.6. | |
| − | + | This result suggests that investing in firewalls with strong administrator authentication is not sufficient to improve the security posture of the utility when facing an insider engineer adversary, as the adversary may simply attempt a different avenue of attack that bypasses the firewalls entirely. | |
| − | |||
| − | |||
| − | |||
| − | + | The net profitability of the most attractive paths from an arbitrary starting point in the '''Strong Firewalls Configuration''' | |
| − | + | HMI_GainLocalUIAccessDevice '''<- Attack Chosen by the Adversary''' | |
| − | + | Total Cost for HMI_GainLocalUIAccessDevice is 2 | |
| − | + | Total Detection Probability for HMI_GainLocalUIAccessDevice is 0.141764 | |
| − | + | Total Payoff for HMI_GainLocalUIAccessDevice is 50000 | |
| − | + | Attractiveness for HMI_GainLocalUIAccessDevice is 35821.6 | |
| − | |||
| − | |||
| − | |||
| − | |||
| − | |||
| − | |||
| − | |||
| − | |||
| − | |||
| − | |||
| − | |||
| − | |||
| − | |||
| − | |||
| − | |||
| − | |||
| − | + | EngrLanScadaLanFW_GainRemoteUIAccessDevice | |
| + | Total Cost for EngrLanScadaLanFW_GainRemoteUIAccessDevice is 3 | ||
| + | Total Detection Probability for EngrLanScadaLanFW_GainRemoteUIAccessDevice is 0.141764 | ||
| + | Total Payoff for EngrLanScadaLanFW_GainRemoteUIAccessDevice is 50000 | ||
| + | Attractiveness for EngrLanScadaLanFW_GainRemoteUIAccessDevice is 35820.6 | ||
| − | + | The net profitability of the most attractive paths starting with a particular individual attack in the '''Weak Firewalls Configuration''' | |
| − | + | HMI_GainLocalUIAccessDevice | |
| + | Total Cost for HMI_GainLocalUIAccessDevice is 2 | ||
| + | Total Detection Probability for HMI_GainLocalUIAccessDevice is 0.141764 | ||
| + | Total Payoff for HMI_GainLocalUIAccessDevice is 50000 | ||
| + | Attractiveness for HMI_GainLocalUIAccessDevice is 35821.6 | ||
| − | |||
| − | + | EngrLanScadaLanFW_GainRemoteUIAccessDevice '''<- Attack Chosen by the Adversary''' | |
| + | Total Cost for EngrLanScadaLanFW_GainRemoteUIAccessDevice is 803.4 | ||
| + | Total Detection Probability for EngrLanScadaLanFW_GainRemoteUIAccessDevice is 0.0610645 | ||
| + | Total Payoff for EngrLanScadaLanFW_GainRemoteUIAccessDevice is 50000 | ||
| + | Attractiveness for EngrLanScadaLanFW_GainRemoteUIAccessDevice is 43090.2 | ||
Latest revision as of 15:46, 16 August 2016
This page is home for the tutorial demonstrating the ADVISE Meta Alpha Tool.
Contents
- 1 Background
- 2 Creating a Model for Security Evaluation Using the ADVISE Meta Tool
- 2.1 Importing an Ontology
- 2.2 Creating an ADVISE Meta Model
- 2.2.1 Creating a new project
- 2.2.2 Creating global variables
- 2.2.3 Creating a New ADVISE Meta Atomic Model
- 2.2.4 Creating a System Model
- 2.2.5 Defining the Goals
- 2.2.6 Creating an Adversary Model
- 2.2.7 Creating a Weak Firewalls Configuration
- 2.2.8 Creating a Strong Firewalls Configuration
- 2.2.9 Generating an ADVISE Model
- 2.3 Defining the Reward Model
- 2.4 Running the Model and Viewing the Results
- 3 Interpreting the Results
Background
The goal of this tutorial is to demonstrate the ADVISE Meta Tool. We create two models of an electric distribution system, one with firewalls with weak administrator authentication and one with firewalls with strong administrator authentication, and compare their vulnerability in the face of an attack by an insider. The quantitative security evaluation enabled by this tool may help a system architect select the appropriate design for their security posture.
In this tutorial we will build the model from scratch. Here is a completed version of the project built using this tutorial.
Creating a Model for Security Evaluation Using the ADVISE Meta Tool
The first time you run the alpha tool, you may be prompted for your Mobius license. Enter your Mobius user account or select the license file you have downloaded.
Importing an Ontology
Before we can start creating ADVISE Meta models, we need an ontology to work with. Download the ontology used for this tutorial.
The first time you open Mobius, the Ontology view may not be visible. Show it by selecting the menu Window -> Show View -> Ontology Explorer.
To import the ontology
- Right click on the white space in the Ontology view.
- Select Import...
- Navigate to the ontology you downloaded previously, select it and press Open.
Creating an ADVISE Meta Model
Creating a new project
- Switch from the Ontology view to the Projects view by click on the Projects tab in the upper left corner of the window.
- Right click the Open Projects folder and select New Project.
- Name the project AdviseMetaTutorial.
Creating global variables
Global variables are model parameters that we can use to define experiments on our system by varying the initial values of the global variables. We need to create two global variables for this tutorial.
- Right click on the AdviseMetaTutorial project folder, and click Properties.
- Double click the Global Variables item in the list.
- Add a global variable of type character called userAuthType.
- Click Add.
- Enter userAuthType for the name.
- Select Character from the Type drop down menu.
- Click Finish.
- Add a global variable of type short called userAuthStrength
- Click Add.
- Enter userAuthStrength for the name.
- Leave Short selected in the Type drop down menu.
- Click Finish.
- Click Apply, then click OK to exit.

Creating a New ADVISE Meta Atomic Model
- Right click on the AdviseMetaTutorial project folder and select New.
- Select Atomic in the bottom pane and click Next.
- Select the ADVISE Meta Model from the list, enter the name MetaModel, and click Finish.
Creating a System Model
The system model represents the components of the system of interest and the relationships among these components. The components may include (but are not limited to) networks, firewalls, and workstations, for example. The onNetwork relationship is an example of a relationship that may exist between a workstation and a network.
Creating Networks
- In the components tree on the left, expand the PhysicalThing component node to make the Device and Network component types visible.
- Add a Network component called EngrLAN
- Drag and drop a Network component on to the diagram.
- Click on the new Network 1 component and select the Edit Details button.
- Change the name to EngrLAN, but leave the other attributes set to the defaults.
- Click Finish.
- In the components tree on the left, expand the Network component node to make the WiredNetwork and WirelessNetwork component types visible.
- Add a WiredNetwork component called CorpLAN and leave the attributes set to the defaults.
- Add a WiredNetwork component called SCADALAN and leave the attributes set to the defaults.
Creating Firewalls
- In the components tree on the left, expand the Device component node under the PhysicalThing node to make the Firewall and Host component types visible, then expand the Firewall component node to make the FirewallAppliance and FirewallHosted component types visible.
- Add a FirewallHosted and name it CorpLanScadaLanFW. Enter userAuthStrength in the strengthOfUserAuthentication textbox, and enter userAuthType in the userAuthenticationType textbox.
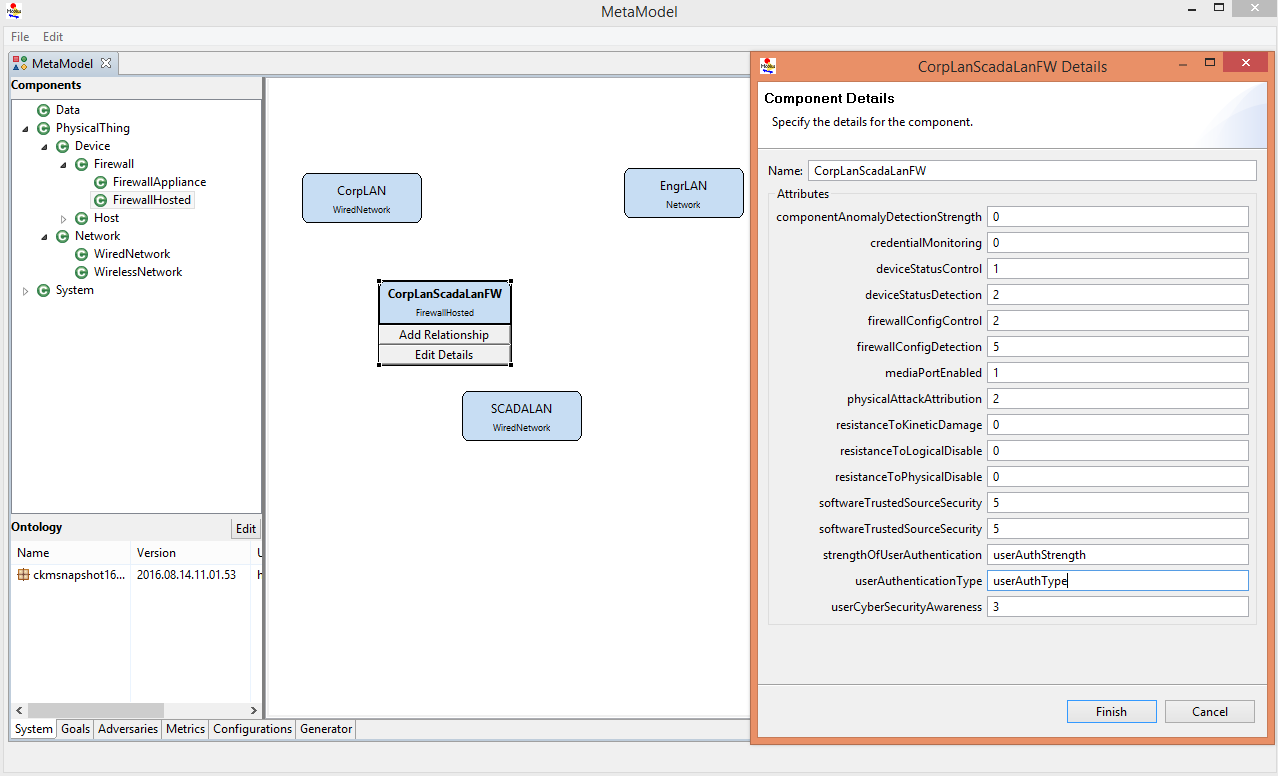 This is an example of a completed firewall component.
 - Add another FirewallHosted and name it CorpLanEngrLanFW. Enter userAuthStrength in the strengthOfUserAuthentication textbox, and enter userAuthType in the userAuthenticationType textbox.
- Add another FirewallHosted and name it EngrLanScadaLanFW. Change strengthOfUserAuthentication from 0 to 1, and change userAuthenticationType from N to W.
- Add a new onNetwork relationship from the CorpLanScadaLanFW to the corpLAN component.
- Select the CorpLanScadaLanFW component, click Add Relationship, and click on the corpLAN component.
- Select the onNetwork relationship from the drop down list.
- Click Finish.
- Add a new onNetwork relationship from the CorpLanScadaLanFW to the SCADALAN component.
- Add a new onNetwork relationship from the EngrLanScadaLanFW to the SCADALAN component.
- Add a new onNetwork relationship from the EngrLanScadaLanFW to the EngrLAN component.
- Add a new onNetwork relationship from the CorpLanEngrLanFW to the EngrLAN component.
- Add a new onNetwork relationship from the CorpLanEngrLanFW to the CorpLAN component.

Creating an SSH Server on a Linux Workstation
- In the components tree on the left, expand the Host component node to make the FirewallHosted, Server and Workstation component types visible.
- Add a new Workstation and name it EngrWorkstation.
- Add a new onNetwork relationship from the EngrWorkstation to the EngrLAN component.
- In the components tree on the left, expand the System component node to make the Device and Software component types visible, then expand the Software component node to make Application and OperatingSystem visible.
- Add a new OperatingSystem and name it LinuxOS.
- Add a new hardwarePlatform relationship from the LinuxOS to the EngrWorkstation, in the same way you created the onNetwork relationships.
- Add a new Application and name it SSHServer.
- Add a new applicationOS relationship from the SSHServer to the LinuxOS, in the same way you created the onNetwork and hardwarePlatform relationships.
Creating an HMI on the SCADALAN
- Add a new Host and name it HMI.
- Add a new onNetwork relationship from the HMI to the SCADALAN component.
Finish the System Model
- Click the File -> Save menu item.

Defining the Goals
- Select the Goals tab at the bottom of the ADVISE Meta Atomic Model Editor window.
- Select the New Goal 1 goal from the list in the upper right.
- Change the name below to read Goal_GainScadaNetworkAccess
- Add the SCADALAN_NetworkAccess state variable to the list of state variables
- Expand the SCADALAN component in the Available State Variables tree on the left side of the window.
- Click and drag the NetworkAccess state variable, and drop it in the list of Dependent State Variables.
- Change the text in the Goal Expression to the following code:
return SCADALAN_NetworkAccess->Mark();
- Click the File -> Save menu item.

Creating an Adversary Model
- Select the Adversaries tab at the bottom of the ADVISE Meta Atomic Model Editor window.
- Click and drag the IndependentInsider adversary template over to the Adversaries list on the right side.
- Change the name below to EngineerInsider.
- Change Cost of Detection to 100000.
- In the Access section, add the access elements the adversary holds at the beginning of the attack.
- Click the Add... button.
- Select the CorpLAN_PhysicalAccess element in the left pane, and click the > button to move it to the right pane.
- Select the CorpLanEngrLanFW_PhysicalAccess element in the left pane, and click the > button to move it to the right pane.
- Select the CorpLanScadaLanFW_PhysicalAccess element in the left pane, and click the > button to move it to the right pane.
- Select the EngrLAN_NetworkAccess element in the left pane, and click the > button to move it to the right pane.
- Select the EngrLAN_PhysicalAccess element in the left pane, and click the > button to move it to the right pane.
- Select the EngrLanScadaLanFW_PhysicalAccess element in the left pane, and click the > button to move it to the right pane.
- Select the EngrWorkstation_HasUserCredentials element in the left pane, and click the > button to move it to the right pane.
- Select the EngrWorkstation_LogicalAccess element in the left pane, and click the > button to move it to the right pane.
- Select the EngrWorkstation_PhysicalAccess element in the left pane, and click the > button to move it to the right pane.
- Select the EngrWorkstation_UIAccess element in the left pane, and click the > button to move it to the right pane.
- Select the HMI_PhysicalAccess element in the left pane, and click the > button to move it to the right pane.
- Select the LinuxOS_HasUserCredentials element in the left pane, and click the > button to move it to the right pane.
- Select the LinuxOS_LogicalAccess element in the left pane, and click the > button to move it to the right pane.
- Select the LinuxOS_UIAccess element in the left pane, and click the > button to move it to the right pane.
- Select the SCADALAN_PhysicalAccess element in the left pane, and click the > button to move it to the right pane.
- Select the SSHServer_HasUserCredentials element in the left pane, and click the > button to move it to the right pane.
- Select the SSHServer_LogicalAccess element in the left pane, and click the > button to move it to the right pane.
- Select the SSHServer_UIAccess element in the left pane, and click the > button to move it to the right pane.
- Click Finish.
- The adversary does not start the attack with any special knowledge of the system.
- Customize the adversary's skill level in the Skills section.
- Click the Add... button.
- Change the initial value of the KineticEquipmentAttack skill to 750.
- Click Finish
- In the Goals section, add the Goal_GainNetworkAccessOnScadaNetwork goal.
- Click the Add.... button.
- Select the Goal_GainScadaNetworkAccess element in the left pane, and click the > button to move it to the right pane.
- Select the Goal_GainScadaNetworkAccess element, and then press the Payoff cell and enter the value 50000.
- Click Finish.
- Click the File -> Save menu item.
Creating a Weak Firewalls Configuration
- Select the Configurations tab at the bottom of the ADVISE Meta Atomic Model Editor window.
- Select the New Configuration 1 configuration from the list on the left.
- Change the name on the right side to read WeakFirewalls
- Add the goal defined previously to the configuration.
- Click the Add button in the Goals section.
- Select the Goal_GainScadaNetworkAccess goal from the list.
- Click Finish.
- Select EngineerInsider as the adversary for this configuration from the drop down list.
- Enter 1 as the Value for userAuthStrength in the Global Variables pane.
- Enter 'W' (including the apostrophes) as the Value for userAuthType in the Global Variables pane.
- Click the File -> Save menu item.

Creating a Strong Firewalls Configuration
- Click on the Add button in the upper left of the screen to add another configuration.
- Change the name on the right side to read StrongFirewalls
- Add the goal defined previously to the configuration.
- Click the Add button in the Goals section.
- Select the Goal_GainScadaNetworkAccess goal from the list.
- Click Finish.
- Select EngineerInsider as the adversary for this configuration from the drop down list.
- Enter 8 as the Value for userAuthStrength in the Global Variables pane.
- Enter 'T' (including the apostrophes) as the Value for userAuthType in the Global Variables pane.
- Click the File -> Save menu item.
Generating an ADVISE Model
To generate the ADVISE Model:
- Select the Generator tab at the bottom of the ADVISE Meta Atomic Model Editor window.
- Select the WeakFirewalls and StrongFirewalls configurations by shift-clicking from the list on the left.
- Click the Generate button. Be patient, this process may take a couple of minutes.
- After getting confirmation of the creation of the simulator, Click on the File->Close menu item.
Defining the Reward Model
We will define a performance variable that will track whether the adversary achieved the goal over a 24-hour period.
- Expand the Reward subfolder in the projects view to reveal newADVISEModelPVs model and double click it to open it.
- Add a new variable called GoalAchieved by entering "GoalAchieved" into the textbox in the top left of the dialog and then pressing "Add Variable:".
- In the "Rate Rewards" tab, define the reward function to be:
return newADVISEModel->Goal_GainScadaNetworkAccess->Mark();;
- Click on the "Apply Changes" button.
- In the "Time" tab, define the timing type to be an "Instant of Time" with an incremental range. The range should be 0-60 with a step size of 10.
- Select the Time Tab
- From the Type drop down list select Instant of Time.
- From the Time Point definition method select Incremental Range.
- In the First time point in series textbox enter 0.0
- In the Upper Bound of series textbox enter 24.0
- In the Step size in series textbox enter 2.0
- Click on the "Apply Changes" button.
- Save and close the reward model by clicking File->Save and File->Close.
This defines a reward model for your ADVISE atomic model that measures the state of the goal over a 24-hour period.
Running the Model and Viewing the Results
- Expand the Solver subfolder in the Projects view and double click the newADVISEModelSim simulator.
- Click on the "Run Simulation" tab and click the "Start Simulation" button.
- Wait for the simulation to complete, this may take several minutes depending on the speed of your machine. When the simulation finishes you should now be looking at the "Results" tab.
- Scroll down to see the mean values of the performance variable at the various time points.
- Values should be similar to
_________________________________Experiment 1_________________________________
Start Time:                  Sun Aug 14 22:21:37 CDT 2016
Finish Time:                 Sun Aug 14 22:22:26 CDT 2016
Elapsed Running Time:        48.419
Total CPU Time:              31.167
Batches Completed:           1000
Experiment Name:             StrongFirewalls
Global Variable Settings:
        Short                userAuthStrength         8
        Character            userAuthType             'T'


_________________________________Mean Results_________________________________
Name                  Time               Mean                     Confidence Interval
GoalAchieved          0.0               0.0000000000E00   +/-   0.0000000000E00
GoalAchieved          2.0               5.1500000000E-01  +/-   3.0991872098E-02
GoalAchieved          4.0               9.7000000000E-01  +/-   1.0578396025E-02
GoalAchieved          6.0               1.0000000000E00   +/-   0.0000000000E00
GoalAchieved          8.0               1.0000000000E00   +/-   0.0000000000E00
GoalAchieved          10.0              1.0000000000E00   +/-   0.0000000000E00
GoalAchieved          12.0              1.0000000000E00   +/-   0.0000000000E00
GoalAchieved          14.0              1.0000000000E00   +/-   0.0000000000E00
GoalAchieved          16.0              1.0000000000E00   +/-   0.0000000000E00
GoalAchieved          18.0              1.0000000000E00   +/-   0.0000000000E00
GoalAchieved          20.0              1.0000000000E00   +/-   0.0000000000E00
GoalAchieved          22.0              1.0000000000E00   +/-   0.0000000000E00
GoalAchieved          24.0              1.0000000000E00   +/-   0.0000000000E00


_______________________________Variance Results_______________________________


_______________________________Interval Results_______________________________


_____________________________Distribution Results_____________________________

_________________________________Experiment 2_________________________________
Start Time:                  Sun Aug 14 22:22:26 CDT 2016
Finish Time:                 Sun Aug 14 22:23:25 CDT 2016
Elapsed Running Time:        59.484
Total CPU Time:              40.158
Batches Completed:           10000
Experiment Name:             WeakFirewalls
Global Variable Settings:
        Short                userAuthStrength         1
        Character            userAuthType             'W'


_________________________________Mean Results_________________________________
Name                  Time               Mean                     Confidence Interval
GoalAchieved          0.0               0.0000000000E00   +/-   0.0000000000E00
GoalAchieved          2.0               0.0000000000E00   +/-   0.0000000000E00
GoalAchieved          4.0               3.0000000000E-03  +/-   1.0719782991E-03  (*)
GoalAchieved          6.0               3.6300000000E-02  +/-   3.6660807717E-03  (*)
GoalAchieved          8.0               1.6290000000E-01  +/-   7.2381403552E-03
GoalAchieved          10.0              3.4830000000E-01  +/-   9.3385271315E-03
GoalAchieved          12.0              4.9200000000E-01  +/-   9.7992354937E-03
GoalAchieved          14.0              5.8290000000E-01  +/-   9.6648453634E-03
GoalAchieved          16.0              6.6230000000E-01  +/-   9.2698070620E-03
GoalAchieved          18.0              7.3310000000E-01  +/-   8.6702911980E-03
GoalAchieved          20.0              7.8630000000E-01  +/-   8.0347836302E-03
GoalAchieved          22.0              8.2660000000E-01  +/-   7.4207881630E-03
GoalAchieved          24.0              8.6220000000E-01  +/-   6.7562607951E-03


_______________________________Variance Results_______________________________


_______________________________Interval Results_______________________________


_____________________________Distribution Results_____________________________


(*) This result did not converge to within the specified confidence interval
Click the File->Close menu item.
To see the adversary paths.
- Open the newADVISEModel ADVISE model under the Atomic folder.
- Press View
- Press Clear
- Press Show Results
Scroll around the Attack Execution Graph to see the adversary paths.


From these images we can derive the attack paths. When faced with the Strong Firewalls configuration the adversary follows this attack path:
- HMI_GainLocalUIAccessDevice
- SCADALAN_GainNetworkAccessViaNetworkNode
When faced with the Weak Firewalls configuration the adversary follows this attack path:
- EngrLanScadaLanFW_GainRemoteUIAccessDevice
- EngrLanScadaLanFW_GainUserCredentials
- EngrLanScadaLanFW_GainLogicalAccess
- SCADALAN_GainNetworkAccessViaNetworkNode
Interpreting the Results
According to this model, the adversary gains access to the SCADA network with a probability of approximately 0.86 after 24 hours, given a system configuration with firewalls with weak administrator authentication. However, the adversary gains access to the SCADA network with a probability of 1 after 24 hours, given a system configuration with firewalls with strong administrator authentication.
This result may not agree with our intuition. We expect that strengthening the defenses will slow the adversary. However, the model says that the adversary achieves his or her goal faster when the defenses are strengthened. However, this surprising result can be explained. The adversary does not factor the speed of completing a set of attacks in this model, but only its net expected profitability (the expected payoff minus the expected cost). Though the adversary can achieve the goal faster with strengthened defenses, it costs more. Our results, presented below, show that with weak defenses the adversary has an net expected profit of 43090.2, but with the strengthened defenses the adversary has an expected net profit of only 35821.6. Strengthening the defenses reduces the adversary's expected profit by (43090.2 - 35821.6) = 7268.6.
This result suggests that investing in firewalls with strong administrator authentication is not sufficient to improve the security posture of the utility when facing an insider engineer adversary, as the adversary may simply attempt a different avenue of attack that bypasses the firewalls entirely.
The net profitability of the most attractive paths from an arbitrary starting point in the Strong Firewalls Configuration
HMI_GainLocalUIAccessDevice <- Attack Chosen by the Adversary
     Total Cost for                  HMI_GainLocalUIAccessDevice is 2
     Total Detection Probability for HMI_GainLocalUIAccessDevice is 0.141764
     Total Payoff for                HMI_GainLocalUIAccessDevice is 50000
  Attractiveness for HMI_GainLocalUIAccessDevice is 35821.6
EngrLanScadaLanFW_GainRemoteUIAccessDevice
     Total Cost for                  EngrLanScadaLanFW_GainRemoteUIAccessDevice is 3
     Total Detection Probability for EngrLanScadaLanFW_GainRemoteUIAccessDevice is 0.141764
     Total Payoff for                EngrLanScadaLanFW_GainRemoteUIAccessDevice is 50000
  Attractiveness for EngrLanScadaLanFW_GainRemoteUIAccessDevice is 35820.6
The net profitability of the most attractive paths starting with a particular individual attack in the Weak Firewalls Configuration
HMI_GainLocalUIAccessDevice
     Total Cost for                  HMI_GainLocalUIAccessDevice is 2
     Total Detection Probability for HMI_GainLocalUIAccessDevice is 0.141764
     Total Payoff for                HMI_GainLocalUIAccessDevice is 50000
  Attractiveness for HMI_GainLocalUIAccessDevice is 35821.6
EngrLanScadaLanFW_GainRemoteUIAccessDevice <- Attack Chosen by the Adversary
     Total Cost for                  EngrLanScadaLanFW_GainRemoteUIAccessDevice is 803.4
     Total Detection Probability for EngrLanScadaLanFW_GainRemoteUIAccessDevice is 0.0610645
     Total Payoff for                EngrLanScadaLanFW_GainRemoteUIAccessDevice is 50000
  Attractiveness for EngrLanScadaLanFW_GainRemoteUIAccessDevice is 43090.2
This page is home for the tutorial demonstrating the ADVISE Meta Alpha Tool.
Contents
- 1 Background
- 2 Creating a Model for Security Evaluation Using the ADVISE Meta Tool
- 2.1 Importing an Ontology
- 2.2 Creating an ADVISE Meta Model
- 2.3 Defining the Reward Model
- 2.4 Defining the Study
- 2.5 Running the Model
- 3 Creating a Second Model for Security Evaluation Using the ADVISE Meta Tool
- 4 Interpreting the Results
Background[edit]
The goal of this tutorial is to demonstrate the ADVISE Meta Tool. We create two models of an electric distribution system, one with firewalls with weak administrator authentication and one with firewalls with strong administrator authentication, and compare their vulnerability in the face of an attack by an insider. The quantitative security evaluation enabled by this tool may help a system architect select the appropriate design for their security posture.
In this tutorial we will build the model from scratch. Here is a completed version of the project built using this tutorial.
Creating a Model for Security Evaluation Using the ADVISE Meta Tool[edit]
The first time you run the alpha tool, you may be prompted for your Mobius license. Enter your Mobius user account or select the license file you have downloaded.
Importing an Ontology[edit]
Before we can start creating ADVISE Meta models, we need an ontology to work with. Download the ontology used for this tutorial.
The first time you open Mobius, the Ontology view may not be visible. Show it by selecting the menu Window -> Show View -> Ontology Explorer.
To import the ontology
- Right click on the white space in the Ontology view.
- Select Import...
- Navigate to the ontology you downloaded previously, select it and press Open.
Creating an ADVISE Meta Model[edit]
Creating a new project[edit]
- Switch from the Ontology view to the Projects view by click on the Projects tab in the upper left corner of the window.
- Right click the Open Projects folder and select New Project.
- Name the project AdviseMetaTutorial.
Creating global variables[edit]
We need to create two global variables for this tutorial.
- Right click on the AdviseMetaTutorial project folder, and click Properties.
- Double click the Global Variables item in the list.
- Add a global variable of type character called userAuthType.
- Click Add.
- Enter userAuthType for the name.
- Select Character from the Type drop down menu.
- Click Finish.
- Add a global variable of type short called userAuthStrength
- Click Add.
- Enter userAuthStrength for the name.
- Leave Short selected in the Type drop down menu.
- Click Finish.
- Click OK to exit.
Creating a New ADVISE Meta Atomic Model[edit]
- Right click on the AdviseMetaTutorial project folder and select New.
- Select Atomic in the bottom pane and click Next.
- Select the ADVISE Meta Model from the list, enter the name MetaModel, and click Finish.
Creating a System Model[edit]
The system model represents the components of the system of interest and the relationships among these components. The components may include (but are not limited to) networks, firewalls, and workstations, for example. The onNetwork relationship is an example of a relationship that may exist between a workstation and a network.
Creating Networks[edit]
- In the components tree on the left, expand the PhysicalThing component node to make the Device and Network component types visible.
- Add a Network component called EngrLAN
- Drag and drop a Network component on to the diagram.
- Click on the new Network 1 component and select the Edit Details button.
- Change the name to EngrLAN, but leave the other attributes set to the defaults.
- Click Finish.
- In the components tree on the left, expand the Network component node to make the WiredNetwork and WirelessNetwork component types visible.
- Add a WiredNetwork component called CorpLAN and leave the attributes set to the defaults.
- Add a WiredNetwork component called SCADALAN and leave the attributes set to the defaults.
Creating Firewalls[edit]
- In the components tree on the left, expand the Device component node under the PhysicalThing node to make the Firewall and Host component types visible, then expand the Firewall component node to make the FirewallAppliance and FirewallHosted component types visible.
- Add a FirewallHosted and name it CorpLanScadaLanFW. Change strengthOfUserAuthentication from 0 to 1, and change userAuthenticationType from N to W. The variable strengthOfUserAuthentication is on a 0-10 scale. The variable N represents no authentication, and W represents weak authentication.
- Add another FirewallHosted and name it CorpLanEngrLanFW. Change strengthOfUserAuthentication from 0 to 1, and change userAuthenticationType from N to W.
- Add another FirewallHosted and name it EngrLanScadaLanFW. Change strengthOfUserAuthentication from 0 to 1, and change userAuthenticationType from N to W.
- Add a new onNetwork relationship from the CorpLanScadaLanFW to the corpLAN component.
- Select the CorpLanScadaLanFW component, click Add Relationship, and click on the corpLAN component.
- Select the onNetwork relationship from the drop down list.
- Click Finish.
- Add a new onNetwork relationship from the CorpLanScadaLanFW to the SCADALAN component.
- Add a new onNetwork relationship from the EngrLanScadaLanFW to the SCADALAN component.
- Add a new onNetwork relationship from the EngrLanScadaLanFW to the EngrLAN component.
- Add a new onNetwork relationship from the CorpLanEngrLanFW to the EngrLAN component.
- Add a new onNetwork relationship from the CorpLanEngrLanFW to the CorpLAN component.
Creating an SSH Server on a Linux Workstation[edit]
- In the components tree on the left, expand the Host component node to make the FirewallHosted, Server and Workstation component types visible.
- Add a new Workstation and name it EngrWorkstation.
- Add a new onNetwork relationship from the EngrWorkstation to the EngrLAN component.
- In the components tree on the left, expand the System component node to make the Device and Software component types visible, then expand the Software component node to make Application and OperatingSystem visible.
- Add a new OperatingSystem and name it LinuxOS.
- Add a new hardwarePlatform relationship from the LinuxOS to the EngrWorkstation, in the same way you created the onNetwork relationships.
- Add a new Application and name it SSHServer.
- Add a new applicationOS relationship from the SSHServer to the LinuxOS, in the same way you created the onNetwork and hardwarePlatform relationships.
Creating an HMI on the SCADALAN[edit]
- Add a new Host and name it HMI.
- Add a new onNetwork relationship from the HMI to the SCADALAN component.
Finish the System Model[edit]
- Click the File -> Save menu item.
Defining the Goals[edit]
- Select the Goals tab at the bottom of the ADVISE Meta Atomic Model Editor window.
- Select the New Goal 1 goal from the list in the upper right.
- Change the name below to read Goal_GainNetworkAccessOnScadaNetwork
- Add the SCADALAN_NetworkAccess state variable to the list of state variables
- Expand the SCADALAN component in the Available State Variables tree on the left side of the window.
- Click and drag the NetworkAccess state variable, and drop it in the list of Dependent State Variables.
- Change the text in the Goal Expression to the following code:
return SCADALAN_NetworkAccess->Mark();
- Click the File -> Save menu item.
Creating an Adversary Model[edit]
- Select the Adversaries tab at the bottom of the ADVISE Meta Atomic Model Editor window.
- Click and drag the IndependentInsider adversary template over to the Adversaries list on the right side.
- Change the name below to EngineerInsider.
- In the Access section, add the access elements the adversary holds at the beginning of the attack.
- Click the Add button.
- Select the CorpLAN_PhysicalAccess element in the left pane, and click the > button to move it to the right pane.
- Select the CorpLanEngrLanFW_PhysicalAccess element in the left pane, and click the > button to move it to the right pane.
- Select the CorpLanScadaLanFW_PhysicalAccess element in the left pane, and click the > button to move it to the right pane.
- Select the EngrLAN_NetworkAccess element in the left pane, and click the > button to move it to the right pane.
- Select the EngrLAN_PhysicalAccess element in the left pane, and click the > button to move it to the right pane.
- Select the EngrLanScadaLanFW_PhysicalAccess element in the left pane, and click the > button to move it to the right pane.
- Select the EngrWorkstation_HasUserCredentials element in the left pane, and click the > button to move it to the right pane.
- Select the EngrWorkstation_LogicalAccess element in the left pane, and click the > button to move it to the right pane.
- Select the EngrWorkstation_PhysicalAccess element in the left pane, and click the > button to move it to the right pane.
- Select the EngrWorkstation_UIAccess element in the left pane, and click the > button to move it to the right pane.
- Select the HMI_PhysicalAccess element in the left pane, and click the > button to move it to the right pane.
- Select the LinuxOS_HasUserCredentials element in the left pane, and click the > button to move it to the right pane.
- Select the LinuxOS_LogicalAccess element in the left pane, and click the > button to move it to the right pane.
- Select the LinuxOS_UIAccess element in the left pane, and click the > button to move it to the right pane.
- Select the SCADALAN_PhysicalAccess element in the left pane, and click the > button to move it to the right pane.
- Select the SSHServer_HasUserCredentials element in the left pane, and click the > button to move it to the right pane.
- Select the SSHServer_LogicalAccess element in the left pane, and click the > button to move it to the right pane.
- Select the SSHServer_UIAccess element in the left pane, and click the > button to move it to the right pane.
- Click Finish.
- The adversary does not start the attack with any special knowledge of the system or customizable skills, so do not modify the adversary's knowledge or skill elements.
- In the Goals section, add the Goal_GainNetworkAccessOnScadaNetwork goal.
- Click the Add button.
- Select the Goal_GainNetworkAccessOnScadaNetwork element in the left pane, and click the > button to move it to the right pane.
- Select the Goal_GainNetworkAccessOnScadaNetwork element, and then press the Payoff cell and enter the value 80000.
- Click Finish.
- Click the File -> Save menu item.
Creating a Configuration[edit]
- Select the Configurations tab at the bottom of the ADVISE Meta Atomic Model Editor window.
- Select the New Configuration 1 configuration from the list on the left.
- Change the name on the right side to read WeakFirewalls
- Add the goal defined previously to the configuration.
- Click the Add button in the Goals section.
- Select the Goal_GainNetworkAccessOnScadaNetwork goal from the list.
- Click Finish.
- Select EngineerInsider as the adversary for this configuration from the drop down list.
- TODO For now leave the metrics blank.
- Click the File -> Save menu item.
Generating an ADVISE Model[edit]
To generate the ADVISE Model:
- Select the Generator tab at the bottom of the ADVISE Meta Atomic Model Editor window.
- Select the WeakFirewalls configuration from the list on the left.
- Click the Generate button.
- Click on the File->Close menu item.
To compile the ADVISE Mode:
- Open the newly created ADVISE model called WeakFirewalls.
- Click on the File->Save menu button. This will automatically compile the model.
- After compilation press the File->Close menu item.
Defining the Reward Model[edit]
We will define a performance variable that will track whether the adversary achieved the goal over a 24-hour period.
- Expand the Reward subfolder in the projects view to reveal WeakFirewallsPVs and double click it to open it.
- Add a new variable called GoalAchieved by entering "GoalAchieved" into the textbox in the top left of the dialog and then pressing "Add Variable:".
- In the "Rate Rewards" tab, define the reward function to be:
return WeakFirewalls->Goal_GainNetworkAccessOnScadaNetwork->Mark();
- Click on the "Apply Changes" button.
- In the "Time" tab, define the timing type to be an "Instant of Time" with an incremental range. The range should be 0-60 with a step size of 10.
- Select the Time Tab
- From the Type drop down list select Instant of Time.
- From the Time Point definition method select Incremental Range.
- In the First time point in series textbox enter 0.0
- In the Upper Bound of series textbox enter 24.0
- In the Step size in series textbox enter 2.0
- Click on the "Apply Changes" button.
- Save and close the reward model by clicking File->Save and File->Close.
This defines a reward model for your ADVISE atomic model that measures the state of the goal over a 24-hour period.
Defining the Study[edit]
- Compile the Range Study.
- Expand the Study subfolder in the Projects view and double click the study called StrongFirewallsStud
- Compile and close the study by clicking on the File->Save and File->Close menu items.
Running the Model[edit]
- Expand the Solver subfolder in the Projects view and double click the WeakFirewallsSim simulator.
- Click on the "Run Simulation" tab and click the "Start Simulation" button.
- Wait for the simulation to complete, this may take several minutes depending on the speed of your machine. When the simulation finishes you should now be looking at the "Results" tab.
- Scroll down to see the mean values of the performance variable at the various time points.
- Values should be similar to
_________________________________Mean Results_________________________________
Name                  Time               Mean                     Confidence Interval
GoalAchieved          0.0               0.0000000000E00   +/-   0.0000000000E00
GoalAchieved          2.0               2.1000000000E-03  +/-   8.9728611192E-04  (*)
GoalAchieved          4.0               2.8200000000E-02  +/-   3.2448213338E-03  (*)
GoalAchieved          6.0               9.8300000000E-02  +/-   5.8356008775E-03
GoalAchieved          8.0               1.8260000000E-01  +/-   7.5726082533E-03
GoalAchieved          10.0              2.5560000000E-01  +/-   8.5499070658E-03
GoalAchieved          12.0              3.2230000000E-01  +/-   9.1606582755E-03
GoalAchieved          14.0              3.7860000000E-01  +/-   9.5072237807E-03
GoalAchieved          16.0              4.3560000000E-01  +/-   9.7188577416E-03
GoalAchieved          18.0              4.8330000000E-01  +/-   9.7950219940E-03
GoalAchieved          20.0              5.3120000000E-01  +/-   9.7813910489E-03
GoalAchieved          22.0              5.7350000000E-01  +/-   9.6940223358E-03
GoalAchieved          24.0              6.1140000000E-01  +/-   9.5541466358E-03
Click the File->Close menu item.
According to this model there is an approximately 61% chance that the Engineer Insider will gain unauthorized access to the SCADA network 24 hours after beginning the attack with this system configuration. We stress that quantitative metrics calculated by ADVISE models are not intended to stand alone. Rather, these metrics are supposed to be compared to metrics that come from similar models. In the next section we will build a model of a similar system with stronger firewalls.
Creating a Second Model for Security Evaluation Using the ADVISE Meta Tool[edit]
Creating another ADVISE Meta Model[edit]
Creating a New ADVISE Meta Atomic Model[edit]
- Right click on the MetaModel1 ADVISE Meta Model created in the previous section. Select Copy and give it the name MetaModel2. Click Finish.
Modifying the Meta Model[edit]
We will use the same system configuration but with strengthened firewalls.
Strengthen Firewalls[edit]
- Open MetaModel2 by double clicking it.
- Select CorpLanScadaLanFW, click on Edit Details, and change strengthOfUserAuthentication from 1 to 8, and change userAuthenticationType from W to T. The variable strengthOfUserAuthentication is on a 0-10 scale. The variable W represents weak authentication, the variable T represents two-factor authentication.
- Select CorpLanEngrLanFW, click on Edit Details, and change strengthOfUserAuthentication from 1 to 8, and change userAuthenticationType from W to T.
- Select EngrLanScadaLanFW, click on Edit Details, and change strengthOfUserAuthentication from 1 to 8, and change userAuthenticationType from W to T.
Finish the System Model[edit]
- Click the File -> Save menu item.
Creating a New Configuration[edit]
- Select the Configurations tab at the bottom of the ADVISE Meta Atomic Model Editor window.
- Change the name of the configuration to StrongFirewalls
- Click the File -> Save menu item.
Generating an ADVISE Model[edit]
To generate the ADVISE Model:
- Select the Generator tab at the bottom of the ADVISE Meta Atomic Model Editor window.
- Select the StrongFirewalls configuration from the list on the left.
- Click the Generate button.
- Click on the File->Close menu item.
To compile the ADVISE Mode:
- Open the newly created ADVISE model called StrongFirewalls.
- Click on the File->Save menu button. This will automatically compile the model.
- After compilation press the File->Close menu item.
Defining the Reward Model[edit]
We will define a performance variable that will track whether the adversary achieved the goal over a 24-hour period. This is exactly the same process used to create the reward variable previously described in the tutorial.
- Expand the Reward subfolder in the projects view to reveal StrongFirewallsPVs and double click it to open it.
- Add a new variable called GoalAchieved by entering "GoalAchieved" into the textbox in the top left of the dialog and then pressing "Add Variable:".
- In the "Rate Rewards" tab, define the reward function to be:
return StrongFirewalls->Goal_GainNetworkAccessOnScadaNetwork->Mark();
- Click on the "Apply Changes" button.
- In the "Time" tab, define the timing type to be an "Instant of Time" with an incremental range. The range should be 0-60 with a step size of 10.
- Select the Time Tab
- From the Type drop down list select Instant of Time.
- From the Time Point definition method select Incremental Range.
- In the First time point in series textbox enter 0.0
- In the Upper Bound of series textbox enter 24.0
- In the Step size in series textbox enter 2.0
- Click on the "Apply Changes" button.
- Save and close the reward model by clicking File->Save and File->Close.
This defines a reward model for the ADVISE atomic model that measures the state of the goal over a 24-hour period.
Defining the Study[edit]
- Compile the Range Study.
- Expand the Study subfolder in the Projects view and double click the study called StrongFirewallsStud
- Select Study in the Component Category in the bottom pane and and select the "Next >" button at the bottom of the dialog.
- Compile and close the study by clicking on the File->Save and File->Close menu items.
Running the Model[edit]
- Expand the Solver subfolder in the Projects view and double click the StrongFirewallsSim simulator.
- Click on the "Run Simulation" tab and click the "Start Simulation" button.
- Wait for the simulation to complete, this may take several minutes depending on the speed of your machine. When the simulation finishes you should now be looking at the "Results" tab.
- Scroll down to see the mean values of the performance variable at the various time points.
- Values should be similar to
_________________________________Mean Results_________________________________
Name                  Time               Mean                     Confidence Interval
GoalAchieved          0.0               0.0000000000E00   +/-   0.0000000000E00
GoalAchieved          2.0               5.1500000000E-01  +/-   3.0991872098E-02
GoalAchieved          4.0               9.7000000000E-01  +/-   1.0578396025E-02
GoalAchieved          6.0               1.0000000000E00   +/-   0.0000000000E00
GoalAchieved          8.0               1.0000000000E00   +/-   0.0000000000E00
GoalAchieved          10.0              1.0000000000E00   +/-   0.0000000000E00
GoalAchieved          12.0              1.0000000000E00   +/-   0.0000000000E00
GoalAchieved          14.0              1.0000000000E00   +/-   0.0000000000E00
GoalAchieved          16.0              1.0000000000E00   +/-   0.0000000000E00
GoalAchieved          18.0              1.0000000000E00   +/-   0.0000000000E00
GoalAchieved          20.0              1.0000000000E00   +/-   0.0000000000E00
GoalAchieved          22.0              1.0000000000E00   +/-   0.0000000000E00
GoalAchieved          24.0              1.0000000000E00   +/-   0.0000000000E00
Click the File->Close menu item.
According to this model it is certain that the Engineer Insider will gain unauthorized access to the SCADA network 24 hours after beginning the attack with this system configuration. We stress that quantitative metrics calculated by ADVISE models are not intended to stand alone. Rather, these metrics are supposed to be compared to metrics that come from similar models, such as the system configuration with the weak firewalls created earlier in the tutorial.
Interpreting the Results[edit]
According to this model, the adversary gains access to the SCADA network with a probability of approximately 0.61 after 24 hours, given a system configuration with firewalls with weak administrator authentication. However, the adversary gains access to the SCADA network with a probability of 1 after 24 hours, given a system configuration with firewalls with strong administrator authentication. This suggests that investing in firewalls with strong administrator authentication is not sufficient to improve the security posture the utility when facing an insider engineer adversary, as the adversary may simply attempt a different avenue of attack the bypasses the firewalls entirely.