Building Models

From Mobius Wiki
Revision as of 00:54, 21 February 2014 by Duyenle2 (talk | contribs)
Jump to: navigation, search

Project Manager

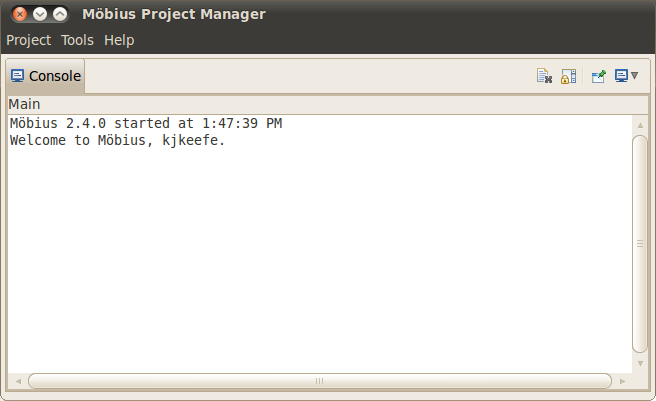
The Project Manager is the main console for Möbius and is shown in Figure 1.1. Across the top is a main menu, with three menu categories: Project, Tools, and Help. The main display is a console view that shows messages for the operations performed by Möbius. Descriptions of the operations available under each menu category are presented in the following sections.


Figure 1.1: The Project Manager window.


Figure 1.1: The Project Manager window.


Project Menu

The Project menu contains several operations related to Möbius projects. A Möbius project is the fundamental unit of organization for each system model in Möbius. A project contains one or more models defining the system and instances, descriptions of what parameters to solve for, and instances of solvers to generate the solutions. More details on projects can be found in Section 2.

The Project menu contains the following operations:

  • New: Create a new project. A dialog will appear prompting for the new project name. After you enter a valid project name, the author, and a description. The author and description are optional and for informational purposes only. These two fields can be changed at a later date. The new project will be opened.
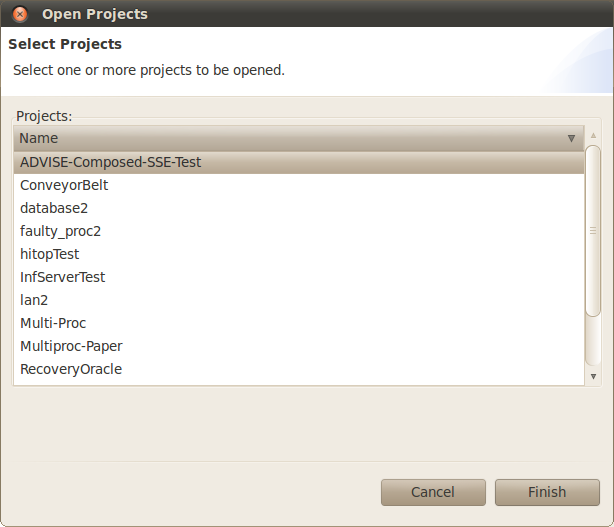
  • Open: Open an existing project. A dialog to select the project to open will appear as shown in Figure 1.2. You may select multiple projects to be opened simultaneously. You can quickly open a single project by double clicking it.


Figure 1.2: Project selection dialog.


Figure 1.2: Use the project selection dialog to open projects.


  • Copy: Copy an existing project to a new project. You must close the existing project to guarantee a stable copy.
  • Rename: Give an existing project a new name. You must close the project before it can be renamed.
  • Clean: Remove all temporary files from the project.
  • Resave: Regenerate all project source code and libraries. Resaving the project is required before a project is opened for the first time after a Möbius upgrade. You must also resave after unarchiving a project.
  • Delete: Delete the project. The most-recently-deleted project is stored in a “Deleted” folder within the Möbius project directory.
  • Archive: Create a backup of the project. After you select one or more projects, you will be asked for details about how you want each of the selected projects to be archived. After you specify the name of the archive file, you must select one of two options, Full archive and Minimal archive. A full archive includes all files found within the project. A minimal archive includes only the files necessary to define all models within the project. In a minimal archive, object files, libraries, executables, and results are not backed up. Minimal archives are helpful when multiple users are collaborating on the same model, since they create small archives that are convenient to email. The format for the archive is gzipped tar (.tgz) format.
  • Unarchive: Restore a project from an archive file. If the project to be restored has the same name as an existing project, you can either delete the existing project or cancel the restoration. Restoring one project on top of a different one could cause corruption and confusion, so is not supported. Unarchived projects should be resaved before they are used.
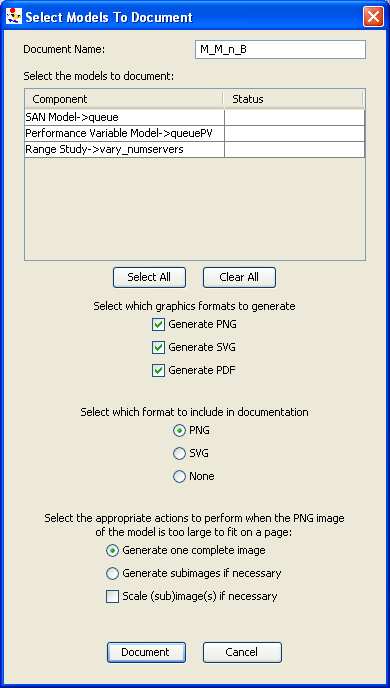
  • Document: Create HTML documentation for the chosen project. After you select the project to document, you use the Document Project dialog (see Figure 1.3) to select the models in the project that should be documented. Documentation is written to a subdirectory in the Documentation directory within the selected project’s project directory. The name of the subdirectory is given by the Document Name field in the dialog. You can view it with a web browser, or import it into software such as Microsoft Word for format refinement and printing.
Möbius supports three image formats for output: PNG, SVG, and PDF. You select which formats you want generated by selecting the appropriate checkboxes. Also, you can include one of these outputs into the generated HTML documentation.
There are four options in the dialog that are helpful when dealing with images that are too large to fit on a single page:
- Generate one complete image will create a single image for the model.
- Generate subimages if necessary will subdivide the full image in width and/or height and generate two or four subimages. The width is subdivided if the original image is more than 650 pixels wide. The height is subdivided if the original image is more than 700 pixels tall.
- Scale subimages will scale each subimage that is larger than a single page in size. The scaling is proportional and the resulting image will be at most 650 wide or 700 pixels tall.


Figure 1.3: The Document Project dialog.


Figure 1.3: The Document Project dialog is used to select models from the project to include in the documentation.


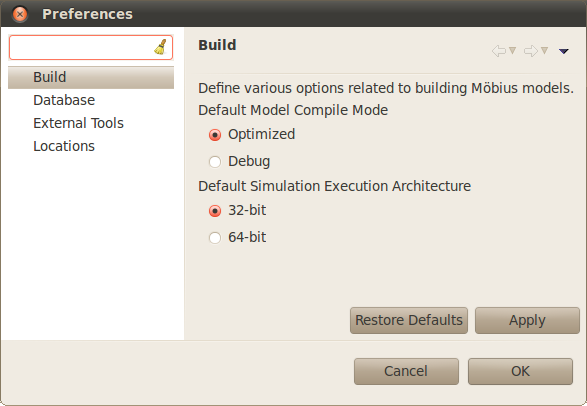
  • Preferences: Launch the preferences window (see Figure 1.4).


Figure 1.4: The Möbius Preferences dialog.


Figure 1.4: The Möbius Preferences dialog is used to change various preferences about the operation of Möbius.


  • Quit: Exit Möbius.


Möbius

Möbius Tool

Motivation

Solution techniques

Graph composition


<equation id="eqn:binom" shownumber>

f(k)=\binom{n}{k}p^k(1-p)^{n-k}\quad k=0,1,\dots,n

</equation>

Sort of like <xr id="eqn:binom" />, but not really.

References

Project Manager[edit]

The Project Manager is the main console for Möbius and is shown in Figure 1.1. Across the top is a main menu, with three menu categories: Project, Tools, and Help. The main display is a console view that shows messages for the operations performed by Möbius. Descriptions of the operations available under each menu category are presented in the following sections.


Figure 1.1: The Project Manager window.


Figure 1.1: The Project Manager window.


Project Menu[edit]

The Project menu contains several operations related to Möbius projects. A Möbius project is the fundamental unit of organization for each system model in Möbius. A project contains one or more models defining the system and instances, descriptions of what parameters to solve for, and instances of solvers to generate the solutions. More details on projects can be found in Section 2.

The Project menu contains the following operations:

  • New: Create a new project. A dialog will appear prompting for the new project name. After you enter a valid project name, the author, and a description. The author and description are optional and for informational purposes only. These two fields can be changed at a later date. The new project will be opened.
  • Open: Open an existing project. A dialog to select the project to open will appear as shown in Figure 1.2. You may select multiple projects to be opened simultaneously. You can quickly open a single project by double clicking it.


Figure 1.2: Project selection dialog.


Figure 1.2: Use the project selection dialog to open projects.


  • Copy: Copy an existing project to a new project. You must close the existing project to guarantee a stable copy.
  • Rename: Give an existing project a new name. You must close the project before it can be renamed.
  • Clean: Remove all temporary files from the project.
  • Resave: Regenerate all project source code and libraries. Resaving the project is required before a project is opened for the first time after a Möbius upgrade. You must also resave after unarchiving a project.
  • Delete: Delete the project. The most-recently-deleted project is stored in a “Deleted” folder within the Möbius project directory.
  • Archive: Create a backup of the project. After you select one or more projects, you will be asked for details about how you want each of the selected projects to be archived. After you specify the name of the archive file, you must select one of two options, Full archive and Minimal archive. A full archive includes all files found within the project. A minimal archive includes only the files necessary to define all models within the project. In a minimal archive, object files, libraries, executables, and results are not backed up. Minimal archives are helpful when multiple users are collaborating on the same model, since they create small archives that are convenient to email. The format for the archive is gzipped tar (.tgz) format.
  • Unarchive: Restore a project from an archive file. If the project to be restored has the same name as an existing project, you can either delete the existing project or cancel the restoration. Restoring one project on top of a different one could cause corruption and confusion, so is not supported. Unarchived projects should be resaved before they are used.
  • Document: Create HTML documentation for the chosen project. After you select the project to document, you use the Document Project dialog (see Figure 1.3) to select the models in the project that should be documented. Documentation is written to a subdirectory in the Documentation directory within the selected project’s project directory. The name of the subdirectory is given by the Document Name field in the dialog. You can view it with a web browser, or import it into software such as Microsoft Word for format refinement and printing.
Möbius supports three image formats for output: PNG, SVG, and PDF. You select which formats you want generated by selecting the appropriate checkboxes. Also, you can include one of these outputs into the generated HTML documentation.
There are four options in the dialog that are helpful when dealing with images that are too large to fit on a single page:
- Generate one complete image will create a single image for the model.
- Generate subimages if necessary will subdivide the full image in width and/or height and generate two or four subimages. The width is subdivided if the original image is more than 650 pixels wide. The height is subdivided if the original image is more than 700 pixels tall.
- Scale subimages will scale each subimage that is larger than a single page in size. The scaling is proportional and the resulting image will be at most 650 wide or 700 pixels tall.


Figure 1.3: The Document Project dialog.


Figure 1.3: The Document Project dialog is used to select models from the project to include in the documentation.


  • Preferences: Launch the preferences window (see Figure 1.4).


Figure 1.4: The Möbius Preferences dialog.


Figure 1.4: The Möbius Preferences dialog is used to change various preferences about the operation of Möbius.


  • Quit: Exit Möbius.


Möbius

Möbius Tool[edit]

Motivation[edit]

Solution techniques[edit]

Graph composition


<equation id="eqn:binom" shownumber>

f(k)=\binom{n}{k}p^k(1-p)^{n-k}\quad k=0,1,\dots,n

</equation>

Sort of like <xr id="eqn:binom" />, but not really.

References[edit]