Difference between revisions of "Project Manager"

From Mobius Wiki
Jump to: navigation, search
Line 1: Line 1:
 
== Project Manager ==
 
== Project Manager ==
  
The Project Manager is the main console for Möbius and is shown in <xr id="fig:projman" />. Across the top is a main menu, with three menu categories: <span style="font-variant:small-caps">Project</span>, <span style="font-variant:small-caps">Tools</span>, and <span style="font-variant:small-caps">Help</span>. The main display is a console view that shows messages for the operations performed by Möbius. Descriptions of the operations available under each menu category are presented in the following sections.
+
The Project Manager is the main console for Möbius and is shown in <xr id="fig:projman" />. Across the top is a main menu, with three menu categories: '''Project''', <span style="font-variant:small-caps">Tools</span>, and <span style="font-variant:small-caps">Help</span>. The main display is a console view that shows messages for the operations performed by Möbius. Descriptions of the operations available under each menu category are presented in the following sections.


Revision as of 21:53, 29 October 2014

Project Manager

The Project Manager is the main console for Möbius and is shown in <xr id="fig:projman" />. Across the top is a main menu, with three menu categories: Project, Tools, and Help. The main display is a console view that shows messages for the operations performed by Möbius. Descriptions of the operations available under each menu category are presented in the following sections.


<figure id="fig:projman">

Projman.png


<xr id="fig:projman" nolink />: The Project Manager window.
</figure>


Project Menu

The Project menu contains several operations related to Möbius projects. A Möbius project is the fundamental unit of organization for each system model in Möbius. A project contains one or more models defining the system and instances, descriptions of what parameters to solve for, and instances of solvers to generate the solutions. More details on projects can be found in Section 2.

The Project menu contains the following operations:

  • New: Create a new project. A dialog will appear prompting for the new project name. After you enter a valid project name, the author, and a description. The author and description are optional and for informational purposes only. These two fields can be changed at a later date. The new project will be opened.
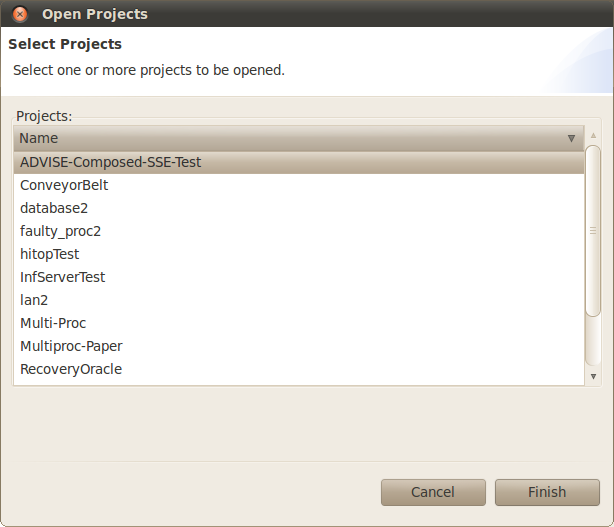
  • Open: Open an existing project. A dialog to select the project to open will appear as shown in <xr id="fig:project_dialog" />. You may select multiple projects to be opened simultaneously. You can quickly open a single project by double clicking it.


<figure id="fig:project_dialog">

Projman projdialog.png


<xr id="fig:project_dialog" nolink />: Use the project selection dialog to open projects.
</figure>


  • Copy: Copy an existing project to a new project. You must close the existing project to guarantee a stable copy.
  • Rename: Give an existing project a new name. You must close the project before it can be renamed.
  • Clean: Remove all temporary files from the project.
  • Resave: Regenerate all project source code and libraries. Resaving the project is required before a project is opened for the first time after a Möbius upgrade. You must also resave after unarchiving a project.
  • Delete: Delete the project. The most-recently-deleted project is stored in a “Deleted” folder within the Möbius project directory.
  • Archive: Create a backup of the project. After you select one or more projects, you will be asked for details about how you want each of the selected projects to be archived. After you specify the name of the archive file, you must select one of two options, Full archive and Minimal archive. A full archive includes all files found within the project. A minimal archive includes only the files necessary to define all models within the project. In a minimal archive, object files, libraries, executables, and results are not backed up. Minimal archives are helpful when multiple users are collaborating on the same model, since they create small archives that are convenient to email. The format for the archive is gzipped tar (.tgz) format.
  • Unarchive: Restore a project from an archive file. If the project to be restored has the same name as an existing project, you can either delete the existing project or cancel the restoration. Restoring one project on top of a different one could cause corruption and confusion, so is not supported. Unarchived projects should be resaved before they are used.
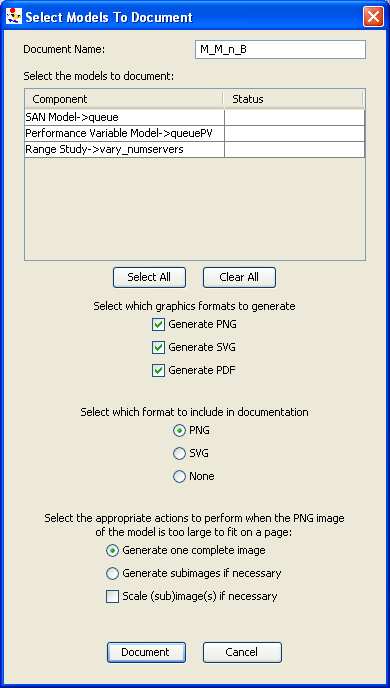
  • Document: Create HTML documentation for the chosen project. After you select the project to document, you use the Document Project dialog (see <xr id="fig:doc_proj" />) to select the models in the project that should be documented. Documentation is written to a subdirectory in the Documentation directory within the selected project’s project directory. The name of the subdirectory is given by the Document Name field in the dialog. You can view it with a web browser, or import it into software such as Microsoft Word for format refinement and printing.
Möbius supports three image formats for output: PNG, SVG, and PDF. You select which formats you want generated by selecting the appropriate checkboxes. Also, you can include one of these outputs into the generated HTML documentation.
There are four options in the dialog that are helpful when dealing with images that are too large to fit on a single page:
Generate one complete image will create a single image for the model.
Generate subimages if necessary will subdivide the full image in width and/or height and generate two or four subimages. The width is subdivided if the original image is more than 650 pixels wide. The height is subdivided if the original image is more than 700 pixels tall.
Scale subimages will scale each subimage that is larger than a single page in size. The scaling is proportional and the resulting image will be at most 650 wide or 700 pixels tall.


<figure id="fig:doc_proj">

Projman document.png


<xr id="fig:doc_proj" nolink />: The Document Project dialog is used to select models from the project to include in the documentation.
</figure>


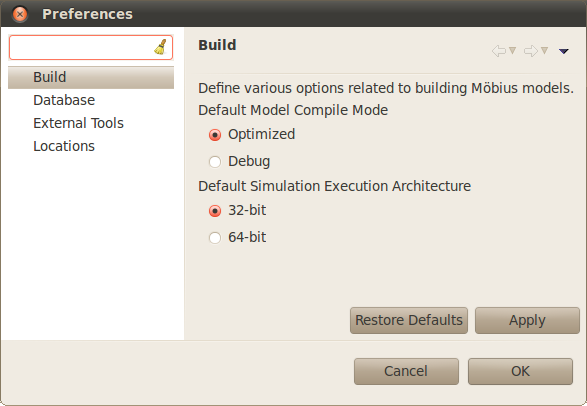
  • Preferences: Launch the preferences window (see <xr id="fig:projman_preferences" />).


<figure id="fig:projman_preferences">

Projman preferences.svg


<xr id="fig:projman_preferences" nolink />: The Möbius Preferences dialog is used to change various preferences about the operation of Möbius.
</figure>


  • Quit: Exit Möbius.

Preferences Dialog

The Preferences dialog (<xr id="fig:projman_preferences" />) provides access to various preferences and settings used during the operation of the Möbius tool. The preferences are broken down into pages listed on the left side of the dialog. Above the pages is a filter text box that you can quickly type a keyword in and the preference pages pertinent to that keyword will be displayed. For example, typing “user” in the filter box will eliminate all the pages except the Database page, because it contains a username field used by the database connection feature.

The Preferences dialog contains the following page:

  • Build: This preference page allows you to define the default compile mode and default simulation execution architecture. Möbius can compile in two modes: normal and optimized. Normal mode incorporates compiler-created debugging symbols into the object files, and uses debug-enabled Möbius AFI libraries when creating the executables, allowing project-generated executables (such as the simulator and state-space generator) to be run through C++ debuggers like gdb. Normal mode also enables Möbius trace output, making it possible to generate files that trace the progress of the model during solution. Normal mode object code takes less time to generate, but is often much larger than optimized code, due to the extra debugging symbols that are included.
Optimized mode enables full compiler optimizations, and disables debug symbols and trace output. Optimized mode should be used when the model is running well, and results need to be produced rapidly.
The results generated should be the same in either mode. The modes allow for the trade-off between extra information needed for debugging and speed of data production.
The default simulation execution architecture mode has two options: 32-bit and 64-bit. For machines running a 32-bit version of their operating system, this setting has no effect as simulations will always be executed in 32-bit mode. However, for machines running a 64-bit operating system, you have the option of building and executing 32-bit or 64-bit simulations. 32-bit simulations will likely run a little faster and take up significantly less memory during execution. However, 64-bit simulations enable access to greater amounts of memory space that may be necessary for large simulations. Simulation results in either mode should be the same.
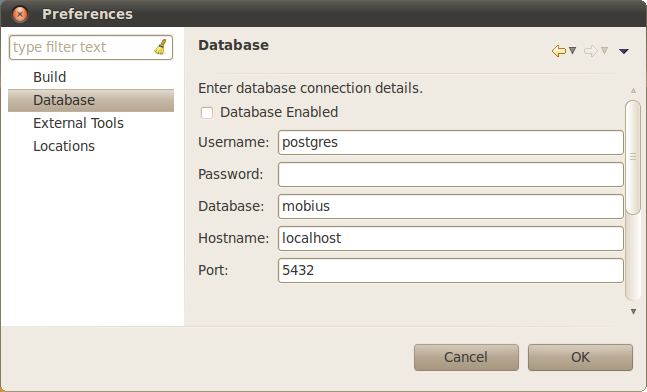
  • Database: The Database settings dialog displays the list settings that are needed to interface Möbius the integrated results database features with the external database server.


<figure id="fig:projman_db">

Projman database.png


<xr id="fig:projman_db" nolink />: The Results Database preference page is used to specify the database access settings.
</figure>


Database Enabled determines if Möbius will connect to the database server using the specified configuration settings.
User Name specifies the name of the database user that Möbius should use when connecting to the database system.
Password specifies the password for the indicated database user.
Database is the name of the database Möbius will create. Multiple databases can be created as needed, simply by changing this name.
Hostname is the name of the machine where the database server is located. Can be a full machine name or “localhost”.
Port is the listening port of the database server. The default port is 5432. Ask your system administrator if the port was changed when the database server was configured.
  • External Tools: The External Tools preference page lists the external tools Möbius uses during its operation. In special cases, you may want to change the tool used to perform a certain operation (for example, the remote shell or archive command). The provided tool must either be in your PATH or the absolute path to the tool should be provided. Some fields are used to specify additional arguments to the external tool whenever it is called.
Compiler: The G++ compiler that Möbius should use.
Compiler Options: Extra compiler options to be used when compiling the Möbius project. This field was originally used to add debugging flags. In current versions, debugging flags are automatically added as part of the normal compilation mode, and this field should typically be blank.
Linker: The linker, ld. Usually set to the path to the standard linker for the system.
Linker Options: Extra linker options to be used when linking Möbius solvers (such as the simulator and state-space generator). For standard use, this field can be left blank.
Make Command: The GNU make tool. The version of make should be 3.7x or later.
Archive Command: The ar tool, the system command used to create C++ library files.
Ranlib Command: The ranlib tool. Ranlib is used during the creation of project libraries.
Remote Shell Command: The command used to gain remote access to other machines on the network. It is not necessary to specify a remote shell command to run Möbius on a single local machine. Typically this command is either rsh or ssh. In either case, system access privileges must be set so that the command can execute without entering a password or pass phrase. More details are available in Appendix section ?? and in the system man pages for rsh and ssh.
Tar Command: The GNU tar command. This command is used to create and restore archive files. NOTE: In the current version of Möbius, tar is used with the “z” option, specifying the archive to be compressed with gzip. Typically gzip is installed in the same directory as tar, but most implementations of tar expect to find gzip in the PATH, and do not expect to have to look for it. If there are error messages when “archive” or “unarchive” commands are run, please see if gzip is found in the system PATH, and update the PATH if necessary.
  • Locations: The locations preference page contains a list of system paths necessary for the operation of Möbius.
Möbius Installation Path: The directory where the Möbius software is installed. This field should update automatically, based on the location of the Möbius executable currently running. Möbius uses this directory to locate the Möbius AFI header files and libraries.
Möbius Projects Directory: The directory containing the desired set of Möbius projects. It is possible to have multiple project directories, and changing this field switches from one to another. Most new users find one project directory is sufficient. The project path should not contain spaces. As a result, the default path on Windows is C:MobiusProject. If multiple people are using Möbius on the same machine, they should all give unique names for their Project directories.


Tools Menu

The Tools menu lists the various utilities available in Möbius. The Data Manager menu item will launch the Möbius Data Manager, which is further described in Section 1 of Utilities.


Help Menu

The Help menu provides various help for the use of Möbius. The About menu item opens the About window. The About window contains information about this version of Möbius, including the vendor and copyright statement.


Console View

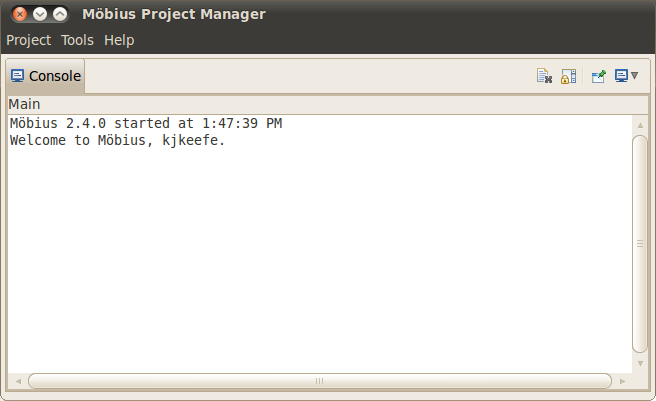
The Console View provides a running output of the operations of Möbius. When a project is opened or a model component is saved, this event is logged by the console for your review. The Console View has several icons in the upper right corner to control the behavior of the console and to switch between the available console logs.

The first icon looks like a document with a grey X over it. This icon clears all the text from the current console log. This can be useful for when you want a fresh start to the log.

The next icon has a lock over a scrolling control. This is the scroll lock and will prevent the console from autumatically scrolling down as new text is appended to the console.

The next icon has pin on a window icon. This is the pin console button and will keep the console view from switching to a different console automatically.

Finally, the last icon allows you to switch between the available console logs. The Main console provides general information about the operation of Möbius. The Error console provides detailed error messages when something goes wrong. The Detailed console provides the finest grain of detail messages possible and includes messages from the other two consoles. Of particular interest, when Möbius executes an external command (e.g. make, java, etc.) the command and its arguments are logged in the Detailed console.

The text of a console log can be highlighted for copy/paste operations like you would expect. Also, if you right click on the text, a simple find feature is available to quickly search through the contents of the log.
Project Manager[edit]

The Project Manager is the main console for Möbius and is shown in <xr id="fig:projman" />. Across the top is a main menu, with three menu categories: Project, Tools, and Help. The main display is a console view that shows messages for the operations performed by Möbius. Descriptions of the operations available under each menu category are presented in the following sections.


<figure id="fig:projman">

Projman.png


<xr id="fig:projman" nolink />: The Project Manager window.
</figure>


Project Menu[edit]

The Project menu contains several operations related to Möbius projects. A Möbius project is the fundamental unit of organization for each system model in Möbius. A project contains one or more models defining the system and instances, descriptions of what parameters to solve for, and instances of solvers to generate the solutions. More details on projects can be found in Section 2.

The Project menu contains the following operations:

  • New: Create a new project. A dialog will appear prompting for the new project name. After you enter a valid project name, the author, and a description. The author and description are optional and for informational purposes only. These two fields can be changed at a later date. The new project will be opened.
  • Open: Open an existing project. A dialog to select the project to open will appear as shown in <xr id="fig:project_dialog" />. You may select multiple projects to be opened simultaneously. You can quickly open a single project by double clicking it.


<figure id="fig:project_dialog">

Projman projdialog.png


<xr id="fig:project_dialog" nolink />: Use the project selection dialog to open projects.
</figure>


  • Copy: Copy an existing project to a new project. You must close the existing project to guarantee a stable copy.
  • Rename: Give an existing project a new name. You must close the project before it can be renamed.
  • Clean: Remove all temporary files from the project.
  • Resave: Regenerate all project source code and libraries. Resaving the project is required before a project is opened for the first time after a Möbius upgrade. You must also resave after unarchiving a project.
  • Delete: Delete the project. The most-recently-deleted project is stored in a “Deleted” folder within the Möbius project directory.
  • Archive: Create a backup of the project. After you select one or more projects, you will be asked for details about how you want each of the selected projects to be archived. After you specify the name of the archive file, you must select one of two options, Full archive and Minimal archive. A full archive includes all files found within the project. A minimal archive includes only the files necessary to define all models within the project. In a minimal archive, object files, libraries, executables, and results are not backed up. Minimal archives are helpful when multiple users are collaborating on the same model, since they create small archives that are convenient to email. The format for the archive is gzipped tar (.tgz) format.
  • Unarchive: Restore a project from an archive file. If the project to be restored has the same name as an existing project, you can either delete the existing project or cancel the restoration. Restoring one project on top of a different one could cause corruption and confusion, so is not supported. Unarchived projects should be resaved before they are used.
  • Document: Create HTML documentation for the chosen project. After you select the project to document, you use the Document Project dialog (see <xr id="fig:doc_proj" />) to select the models in the project that should be documented. Documentation is written to a subdirectory in the Documentation directory within the selected project’s project directory. The name of the subdirectory is given by the Document Name field in the dialog. You can view it with a web browser, or import it into software such as Microsoft Word for format refinement and printing.
Möbius supports three image formats for output: PNG, SVG, and PDF. You select which formats you want generated by selecting the appropriate checkboxes. Also, you can include one of these outputs into the generated HTML documentation.
There are four options in the dialog that are helpful when dealing with images that are too large to fit on a single page:
Generate one complete image will create a single image for the model.
Generate subimages if necessary will subdivide the full image in width and/or height and generate two or four subimages. The width is subdivided if the original image is more than 650 pixels wide. The height is subdivided if the original image is more than 700 pixels tall.
Scale subimages will scale each subimage that is larger than a single page in size. The scaling is proportional and the resulting image will be at most 650 wide or 700 pixels tall.


<figure id="fig:doc_proj">

Projman document.png


<xr id="fig:doc_proj" nolink />: The Document Project dialog is used to select models from the project to include in the documentation.
</figure>


  • Preferences: Launch the preferences window (see <xr id="fig:projman_preferences" />).


<figure id="fig:projman_preferences">

Projman preferences.svg


<xr id="fig:projman_preferences" nolink />: The Möbius Preferences dialog is used to change various preferences about the operation of Möbius.
</figure>


  • Quit: Exit Möbius.

Preferences Dialog[edit]

The Preferences dialog (<xr id="fig:projman_preferences" />) provides access to various preferences and settings used during the operation of the Möbius tool. The preferences are broken down into pages listed on the left side of the dialog. Above the pages is a filter text box that you can quickly type a keyword in and the preference pages pertinent to that keyword will be displayed. For example, typing “user” in the filter box will eliminate all the pages except the Database page, because it contains a username field used by the database connection feature.

The Preferences dialog contains the following page:

  • Build: This preference page allows you to define the default compile mode and default simulation execution architecture. Möbius can compile in two modes: normal and optimized. Normal mode incorporates compiler-created debugging symbols into the object files, and uses debug-enabled Möbius AFI libraries when creating the executables, allowing project-generated executables (such as the simulator and state-space generator) to be run through C++ debuggers like gdb. Normal mode also enables Möbius trace output, making it possible to generate files that trace the progress of the model during solution. Normal mode object code takes less time to generate, but is often much larger than optimized code, due to the extra debugging symbols that are included.
Optimized mode enables full compiler optimizations, and disables debug symbols and trace output. Optimized mode should be used when the model is running well, and results need to be produced rapidly.
The results generated should be the same in either mode. The modes allow for the trade-off between extra information needed for debugging and speed of data production.
The default simulation execution architecture mode has two options: 32-bit and 64-bit. For machines running a 32-bit version of their operating system, this setting has no effect as simulations will always be executed in 32-bit mode. However, for machines running a 64-bit operating system, you have the option of building and executing 32-bit or 64-bit simulations. 32-bit simulations will likely run a little faster and take up significantly less memory during execution. However, 64-bit simulations enable access to greater amounts of memory space that may be necessary for large simulations. Simulation results in either mode should be the same.
  • Database: The Database settings dialog displays the list settings that are needed to interface Möbius the integrated results database features with the external database server.


<figure id="fig:projman_db">

Projman database.png


<xr id="fig:projman_db" nolink />: The Results Database preference page is used to specify the database access settings.
</figure>


Database Enabled determines if Möbius will connect to the database server using the specified configuration settings.
User Name specifies the name of the database user that Möbius should use when connecting to the database system.
Password specifies the password for the indicated database user.
Database is the name of the database Möbius will create. Multiple databases can be created as needed, simply by changing this name.
Hostname is the name of the machine where the database server is located. Can be a full machine name or “localhost”.
Port is the listening port of the database server. The default port is 5432. Ask your system administrator if the port was changed when the database server was configured.
  • External Tools: The External Tools preference page lists the external tools Möbius uses during its operation. In special cases, you may want to change the tool used to perform a certain operation (for example, the remote shell or archive command). The provided tool must either be in your PATH or the absolute path to the tool should be provided. Some fields are used to specify additional arguments to the external tool whenever it is called.
Compiler: The G++ compiler that Möbius should use.
Compiler Options: Extra compiler options to be used when compiling the Möbius project. This field was originally used to add debugging flags. In current versions, debugging flags are automatically added as part of the normal compilation mode, and this field should typically be blank.
Linker: The linker, ld. Usually set to the path to the standard linker for the system.
Linker Options: Extra linker options to be used when linking Möbius solvers (such as the simulator and state-space generator). For standard use, this field can be left blank.
Make Command: The GNU make tool. The version of make should be 3.7x or later.
Archive Command: The ar tool, the system command used to create C++ library files.
Ranlib Command: The ranlib tool. Ranlib is used during the creation of project libraries.
Remote Shell Command: The command used to gain remote access to other machines on the network. It is not necessary to specify a remote shell command to run Möbius on a single local machine. Typically this command is either rsh or ssh. In either case, system access privileges must be set so that the command can execute without entering a password or pass phrase. More details are available in Appendix section ?? and in the system man pages for rsh and ssh.
Tar Command: The GNU tar command. This command is used to create and restore archive files. NOTE: In the current version of Möbius, tar is used with the “z” option, specifying the archive to be compressed with gzip. Typically gzip is installed in the same directory as tar, but most implementations of tar expect to find gzip in the PATH, and do not expect to have to look for it. If there are error messages when “archive” or “unarchive” commands are run, please see if gzip is found in the system PATH, and update the PATH if necessary.
  • Locations: The locations preference page contains a list of system paths necessary for the operation of Möbius.
Möbius Installation Path: The directory where the Möbius software is installed. This field should update automatically, based on the location of the Möbius executable currently running. Möbius uses this directory to locate the Möbius AFI header files and libraries.
Möbius Projects Directory: The directory containing the desired set of Möbius projects. It is possible to have multiple project directories, and changing this field switches from one to another. Most new users find one project directory is sufficient. The project path should not contain spaces. As a result, the default path on Windows is C:MobiusProject. If multiple people are using Möbius on the same machine, they should all give unique names for their Project directories.


Tools Menu[edit]

The Tools menu lists the various utilities available in Möbius. The Data Manager menu item will launch the Möbius Data Manager, which is further described in Section 1 of Utilities.


Help Menu[edit]

The Help menu provides various help for the use of Möbius. The About menu item opens the About window. The About window contains information about this version of Möbius, including the vendor and copyright statement.


Console View[edit]

The Console View provides a running output of the operations of Möbius. When a project is opened or a model component is saved, this event is logged by the console for your review. The Console View has several icons in the upper right corner to control the behavior of the console and to switch between the available console logs.

The first icon looks like a document with a grey X over it. This icon clears all the text from the current console log. This can be useful for when you want a fresh start to the log.

The next icon has a lock over a scrolling control. This is the scroll lock and will prevent the console from autumatically scrolling down as new text is appended to the console.

The next icon has pin on a window icon. This is the pin console button and will keep the console view from switching to a different console automatically.

Finally, the last icon allows you to switch between the available console logs. The Main console provides general information about the operation of Möbius. The Error console provides detailed error messages when something goes wrong. The Detailed console provides the finest grain of detail messages possible and includes messages from the other two consoles. Of particular interest, when Möbius executes an external command (e.g. make, java, etc.) the command and its arguments are logged in the Detailed console.

The text of a console log can be highlighted for copy/paste operations like you would expect. Also, if you right click on the text, a simple find feature is available to quickly search through the contents of the log.